PAGE 1
www.newline-interactive.com/eu/
QUICK START GUIDE

PAGE 2
www.newline-interactive.com/eu/
INDEX
Introduction ............................................................3
1.Software activation and user settings
...............4
1.1 Entering the licence key
...................................4
1.2 Language and standard settings
....................4
1.3 General..............................................................4
1.4 Page
.................................................................. 5
1.5 Style
..................................................................5
2. Screen modes
.....................................................6
2.1 Preparation mode
............................................6
2.2 Presentation mode
...........................................6
2.3 Desktop mode
..................................................7
3. The basics of creating your lesson
...................8
3.1 Setting a background
.......................................8
3.2 Adding text
.....................................................10
3.3 Adding shapes
...............................................10
3.4 Adding images to the canvas
........................ 12
3.5 Adding video to the whiteboard canvas
.......13
3.6 Arranging objects on the stage
..................... 15
4. Opening and saving your les
......................... 16
4.1 Opening Newline Engage les
....................... 16
4.2 Importing other le formats
..........................16
4.3 Saving your lesson
.........................................17
5. Sharing your lesson
.........................................18
6. Main toolbar /preparation mode
.....................19
6.1 Add Page
........................................................19
6.2 Zoom
...............................................................19
6.3 Screen Format
................................................ 19
6.4 Move
...............................................................19
6.5 Reset
...............................................................19
6.6 Start Presentation
.......................................... 20
6.7 Select Mode
....................................................20
6.8 Pen Tools
........................................................ 20
6.9 Eraser tool
......................................................24
6.10 Shape tool
....................................................24
6.11 Resource
.......................................................25
6.12 Interactive templates
................................... 26
6.13 Concept mapping
.........................................29
6.14 Other Whiteboard Tools
............................... 30
6.15 Some additional tools
available in presentation mode
...........................34
7. Adding links to an object /preparation mode
.39
7.1 Files
.................................................................39
7.2 Website
...........................................................40
7.3 Text
.................................................................40
7.4 Page
................................................................40
7.5 Tool
.................................................................40
8. Cover layer for objects /preparation mode
.....40
9. Google Drive Login
...........................................41
9.1 QR Login - Presentation Mode
...................... 41
9.2 QR Login - Preparation Mode
........................41

PAGE 3
www.newline-interactive.com/eu/
INTRODUCTION
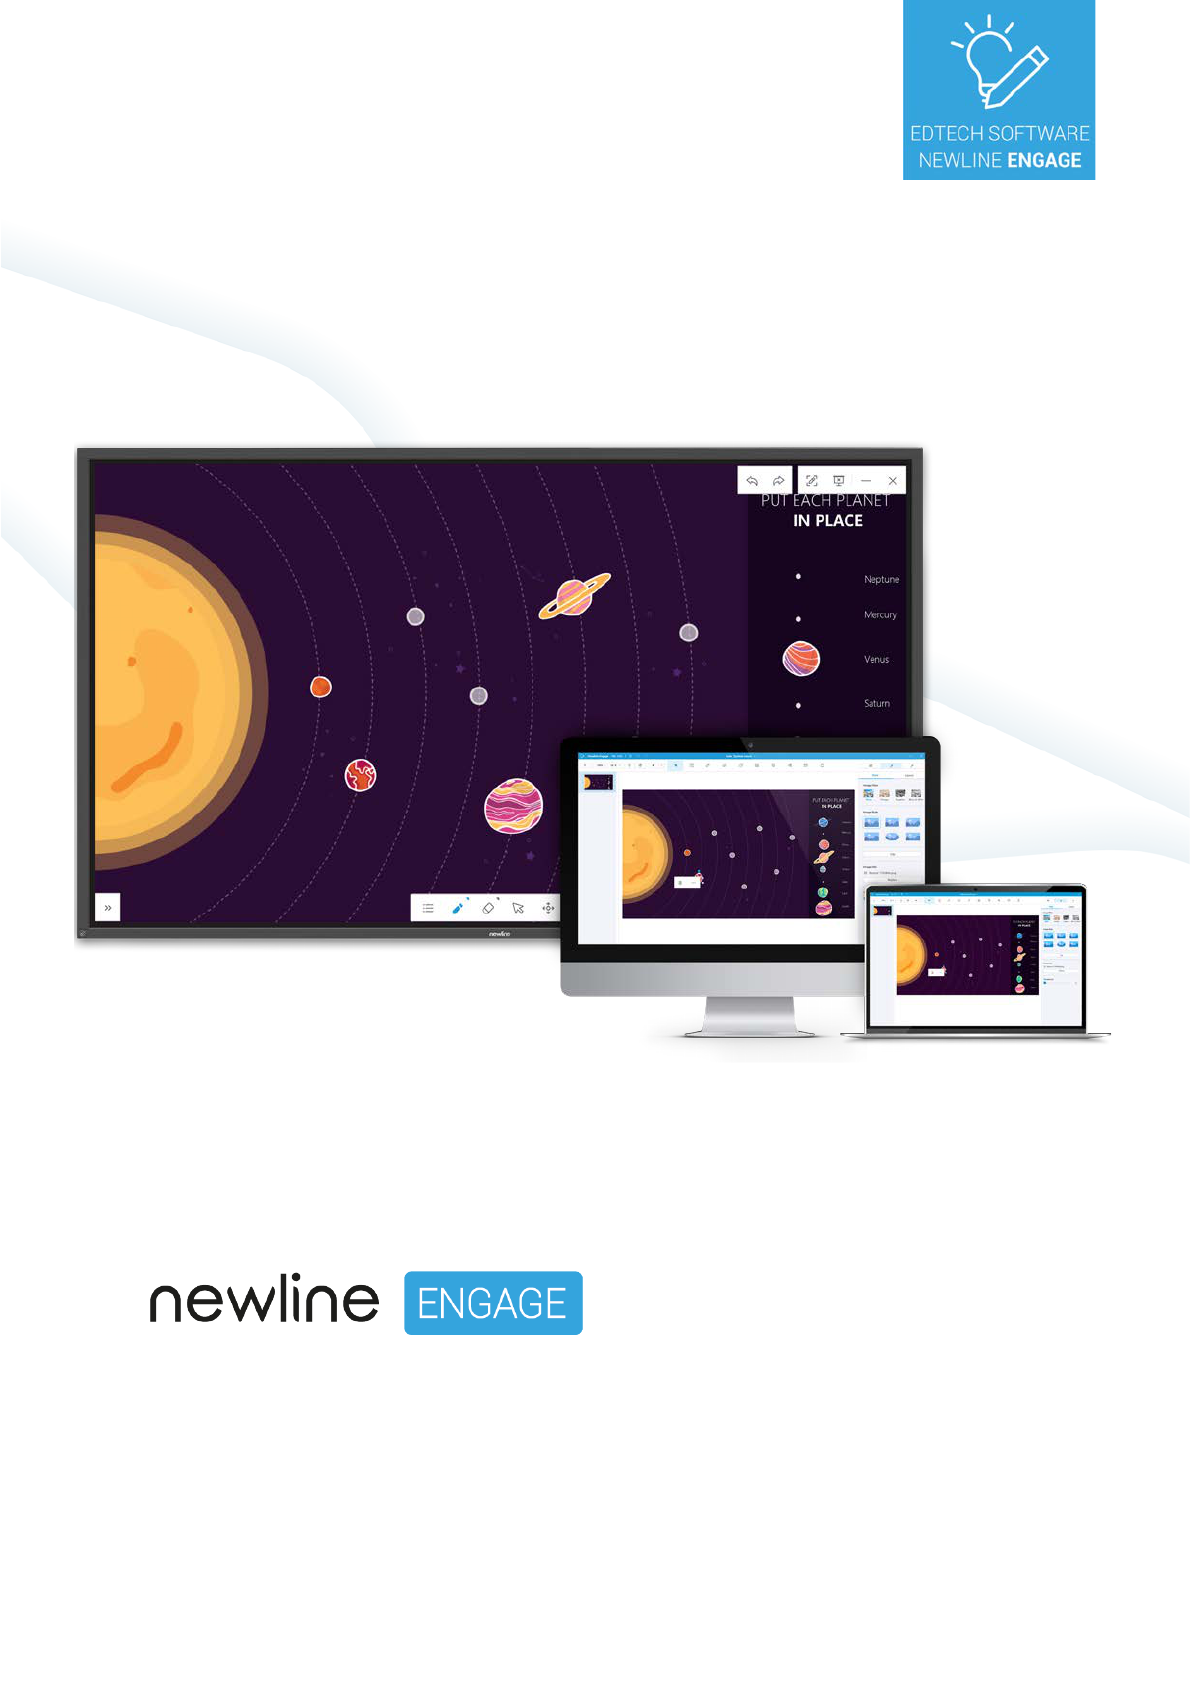
Newline Engage is an easy to use interactive teaching tools, which comes with lesson creation tools
and subject specic content and interactive activities, which allow for the quick and easy creation of
interactive lessons, combine images, shapes, text, video, PDF, PPT, les into one application that can be
presented to your students on the whiteboarding stage.
Make use of all your existing lessons created in other whiteboard software as engage allows import of
.IWB le format as well as SMART Notebook les and Promethean Flipchart les.
PAGE 4
www.newline-interactive.com/eu/
1.SOFTWARE ACTIVATION AND USER SETTINGS
Newline Engage requires a 20 digit licence key to operate for longer than the 30 day trial period available
on installation, once entered the software will upgrade automatically if required and the licence is perpe-
tual so will not expire, each licence key can be used up to 10 times, allowing teachers to install on multiple
devices that they own.
Newline Engage requires a 20 digit licen-
ce key to operate for longer than the 30
day trial period available on installation,
once entered the software will upgrade
automatically if required and the licen-
ce is perpetual so will not expire, each
licence key can be used up to 10 times,
allowing teachers to install on multiple
devices that they own.
1.1 Entering the licence key
1.2 Language and standard settings
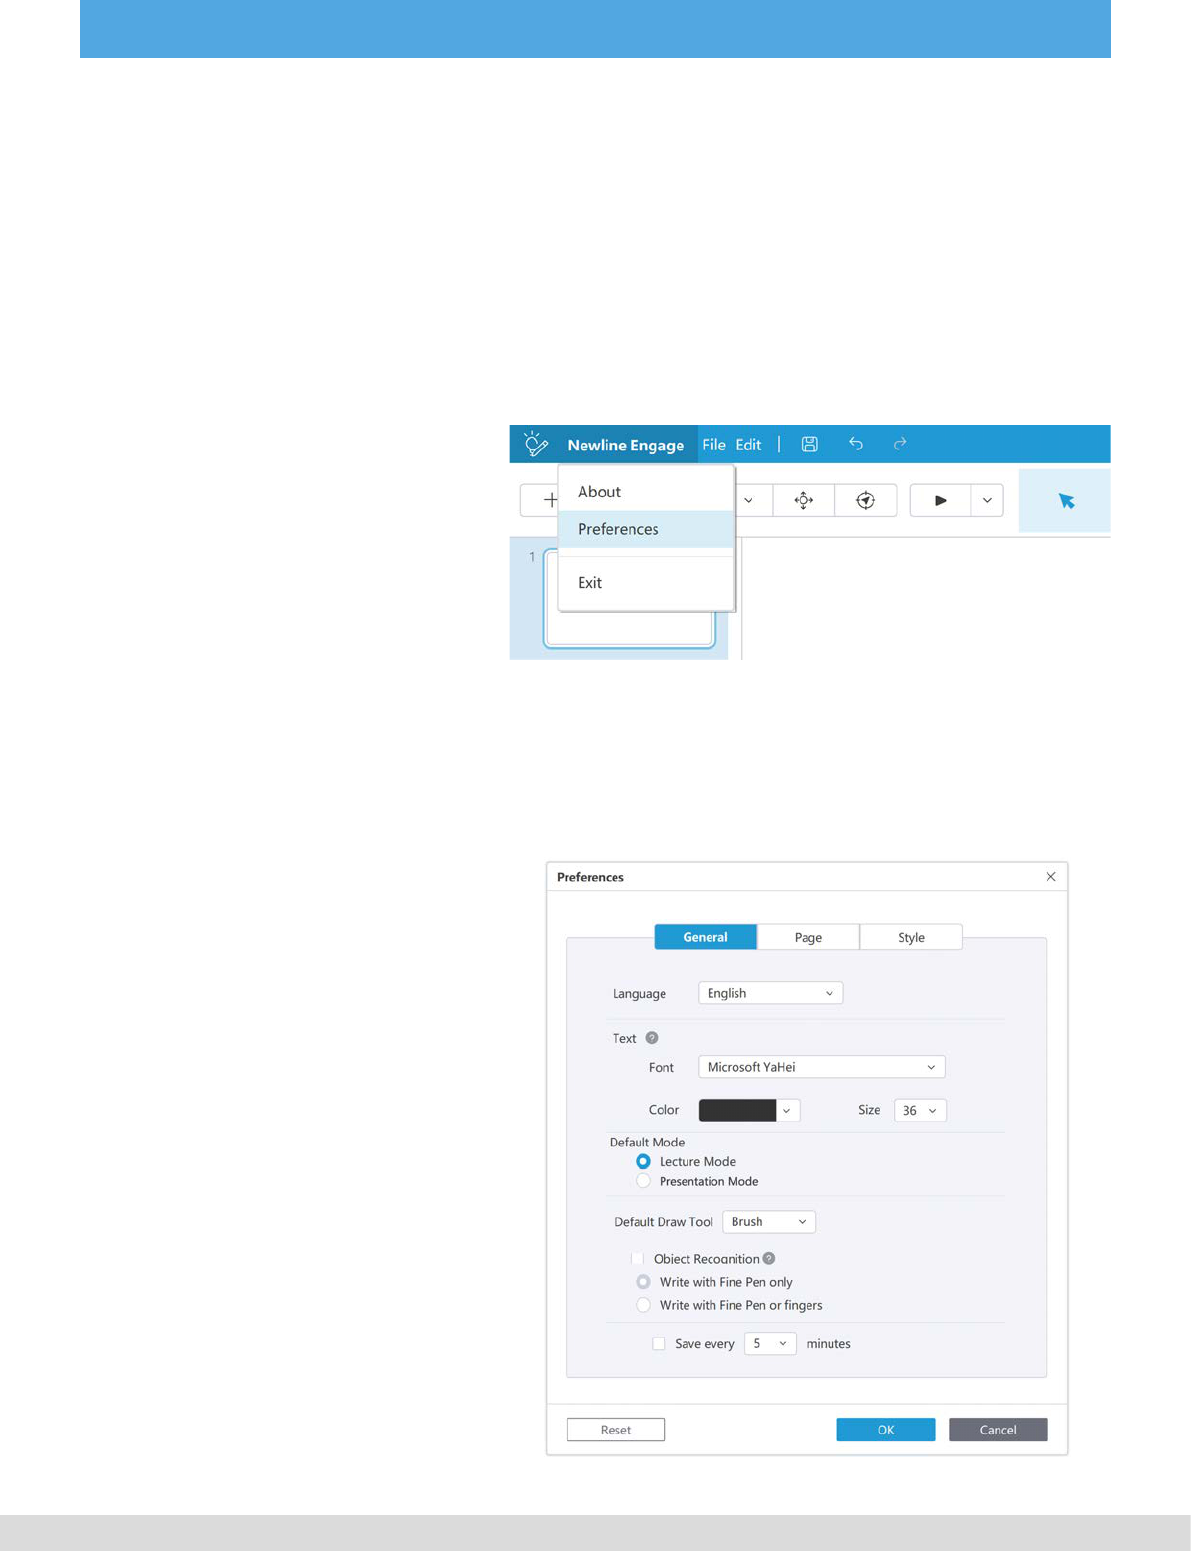
1.3 General
PAGE 5
www.newline-interactive.com/eu/
This allows the end user to enable smart
guides for making content placed on the
canvas much easier to align, Roaming
allows you to control how content be-
haves when the canvas is expanded,
background sets the default canvas
background colour when a new page is
created.
These settings allow you to control the
default pen and shape styles and co-
lours.
1.4 Page
1.5 Style
PAGE 6
www.newline-interactive.com/eu/
2. SCREEN MODES
The software comes with 3 different screen modes that you can work in, you are able to set the software
to start in either preparation mode or presentation mode from within the preferences menu.
This is the main mode for creating and editing your lessons on a desktop or laptop device, although you
can also edit content created on your newline interactive flat panel you are able to easily navigate your
content using the slide sorter and content sensitive preferences settings panel.
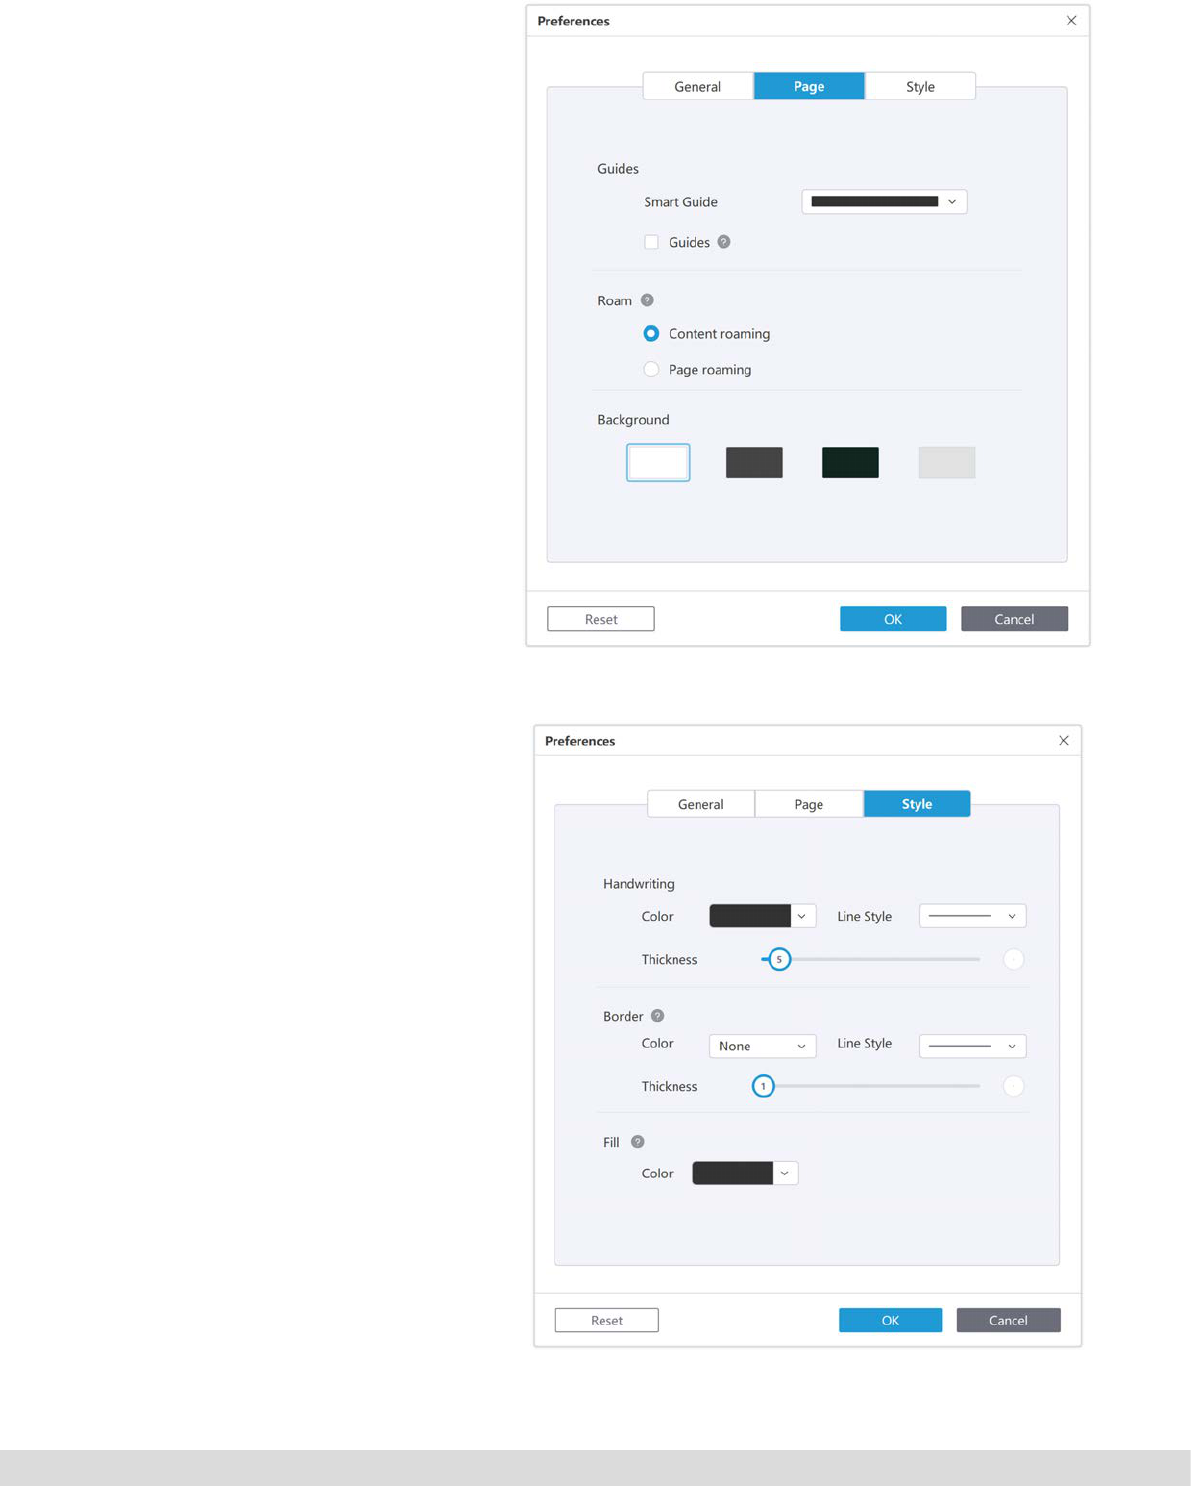
2.1 Preparation mode
This is the main mode for presenting your lesson on the newli-
ne interactive flat panel and removes the page sorter and pre-
ferences settings to give you more room to present, this gives
you access to a floating toolbar for easy access to the main
engage tools, the canvas is innite and can be moved around
easily.
You can enter the presentation mode by clicking on the play
button on the top toolbar and selecting either to start the show
from the current slide or from the beginning.
2.2 Presentation mode
PAGE 7
www.newline-interactive.com/eu/
Presentation Mode View
This mode is enabled through the presentation mode by selecting the pen icon and enables you to navi-
gate and annotate over any other desktop program or web browser and then capture images straight back
to the Engage canvas.
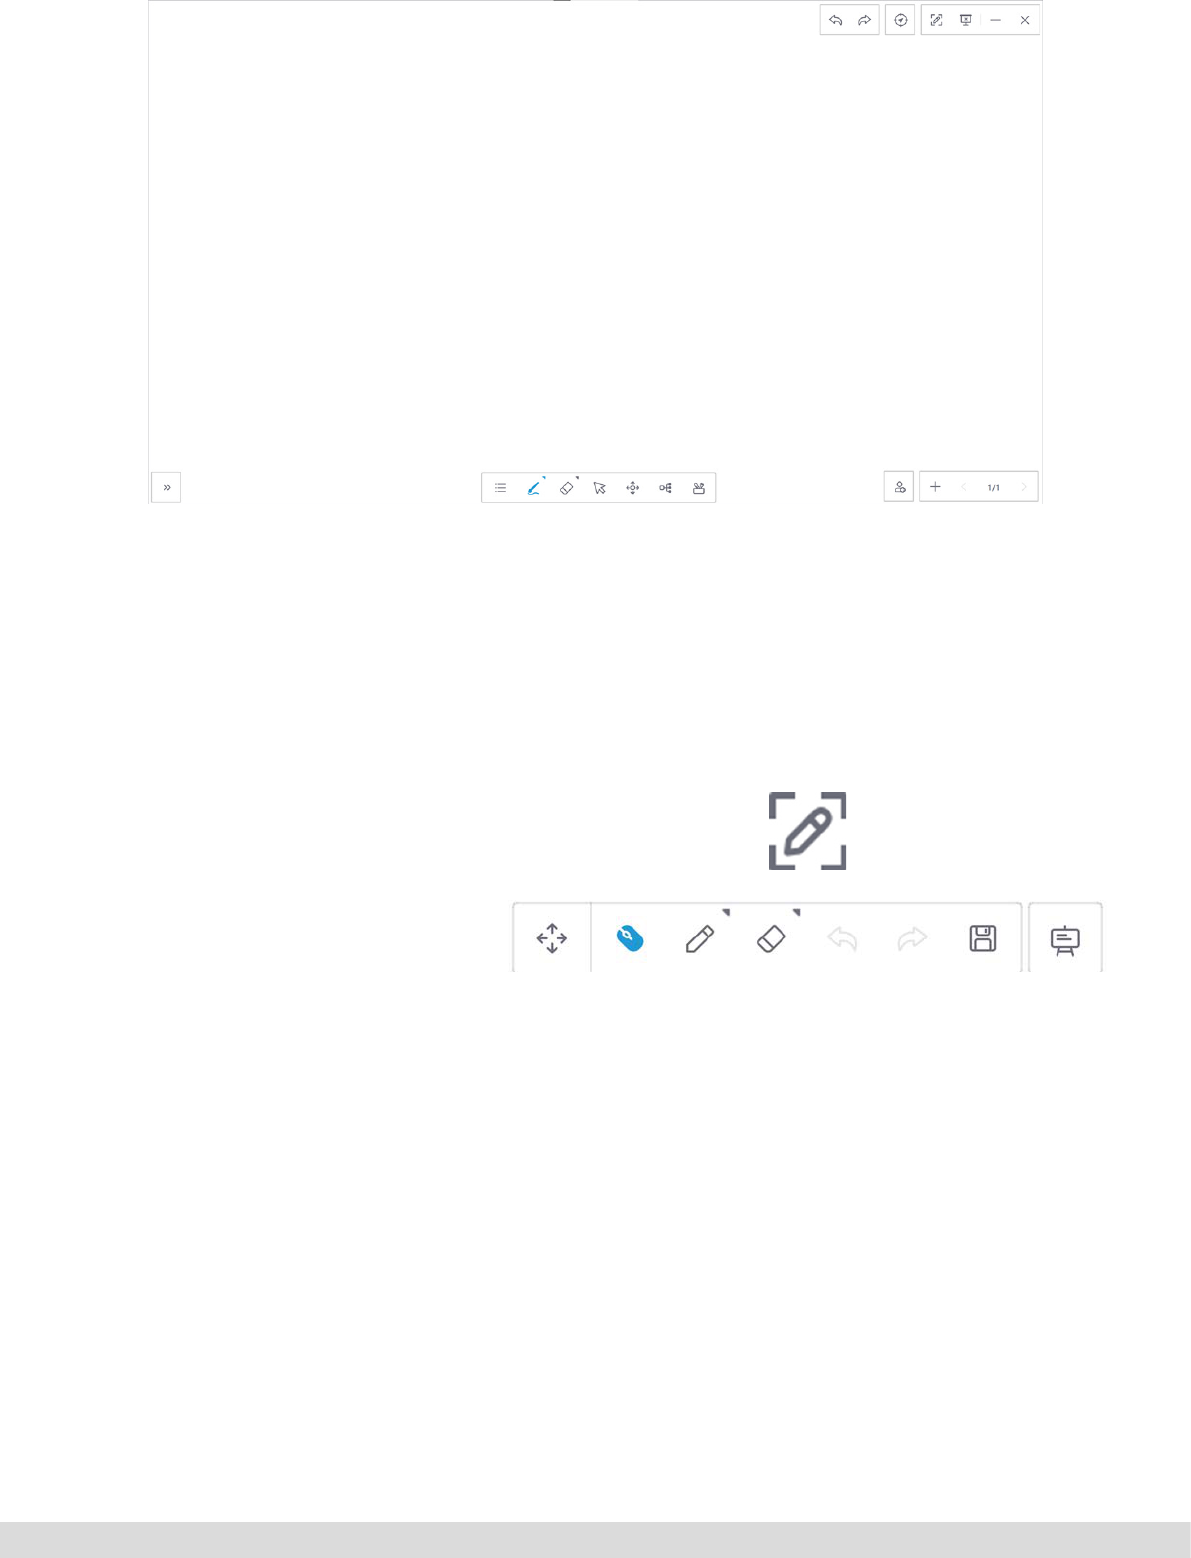
2.3 Desktop mode
Options: move toolbar, mouse mode, Pen
tools, erase ink, go back, go forwards,
save to whiteboard or desktop, return to
engage presentation mode.
PAGE 8
www.newline-interactive.com/eu/
3. THE BASICS OF CREATING YOUR LESSON
Newline Engage allows you to bring a multitude of content, images, videos, shapes, text, documents into
one central place where your lessons can be created and then presented and interacted with the wide
selection of interactive tools.
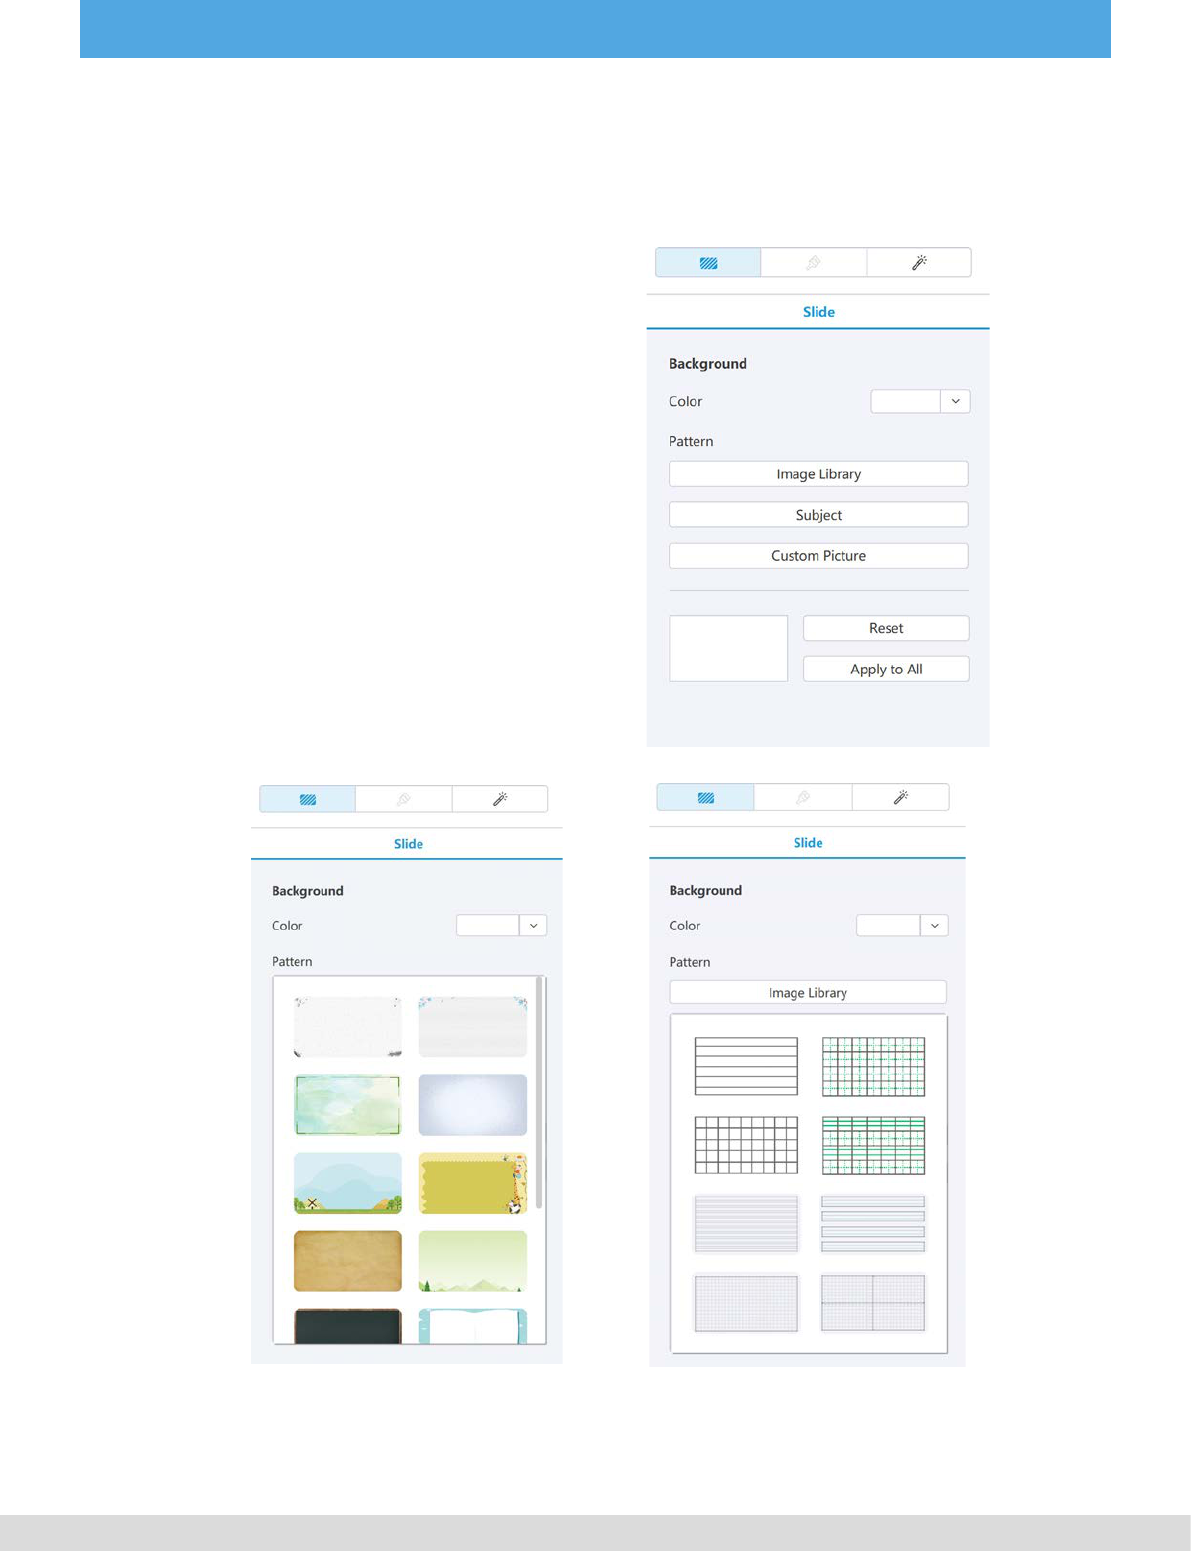
Newline Engage comes with a selec-
tion of starting backgrounds and sub-
ject backgrounds or its very easy to add
your own customer picture, the options
for adding a background can be nd on
the right hand side preferences settings
section of the preparation mode.
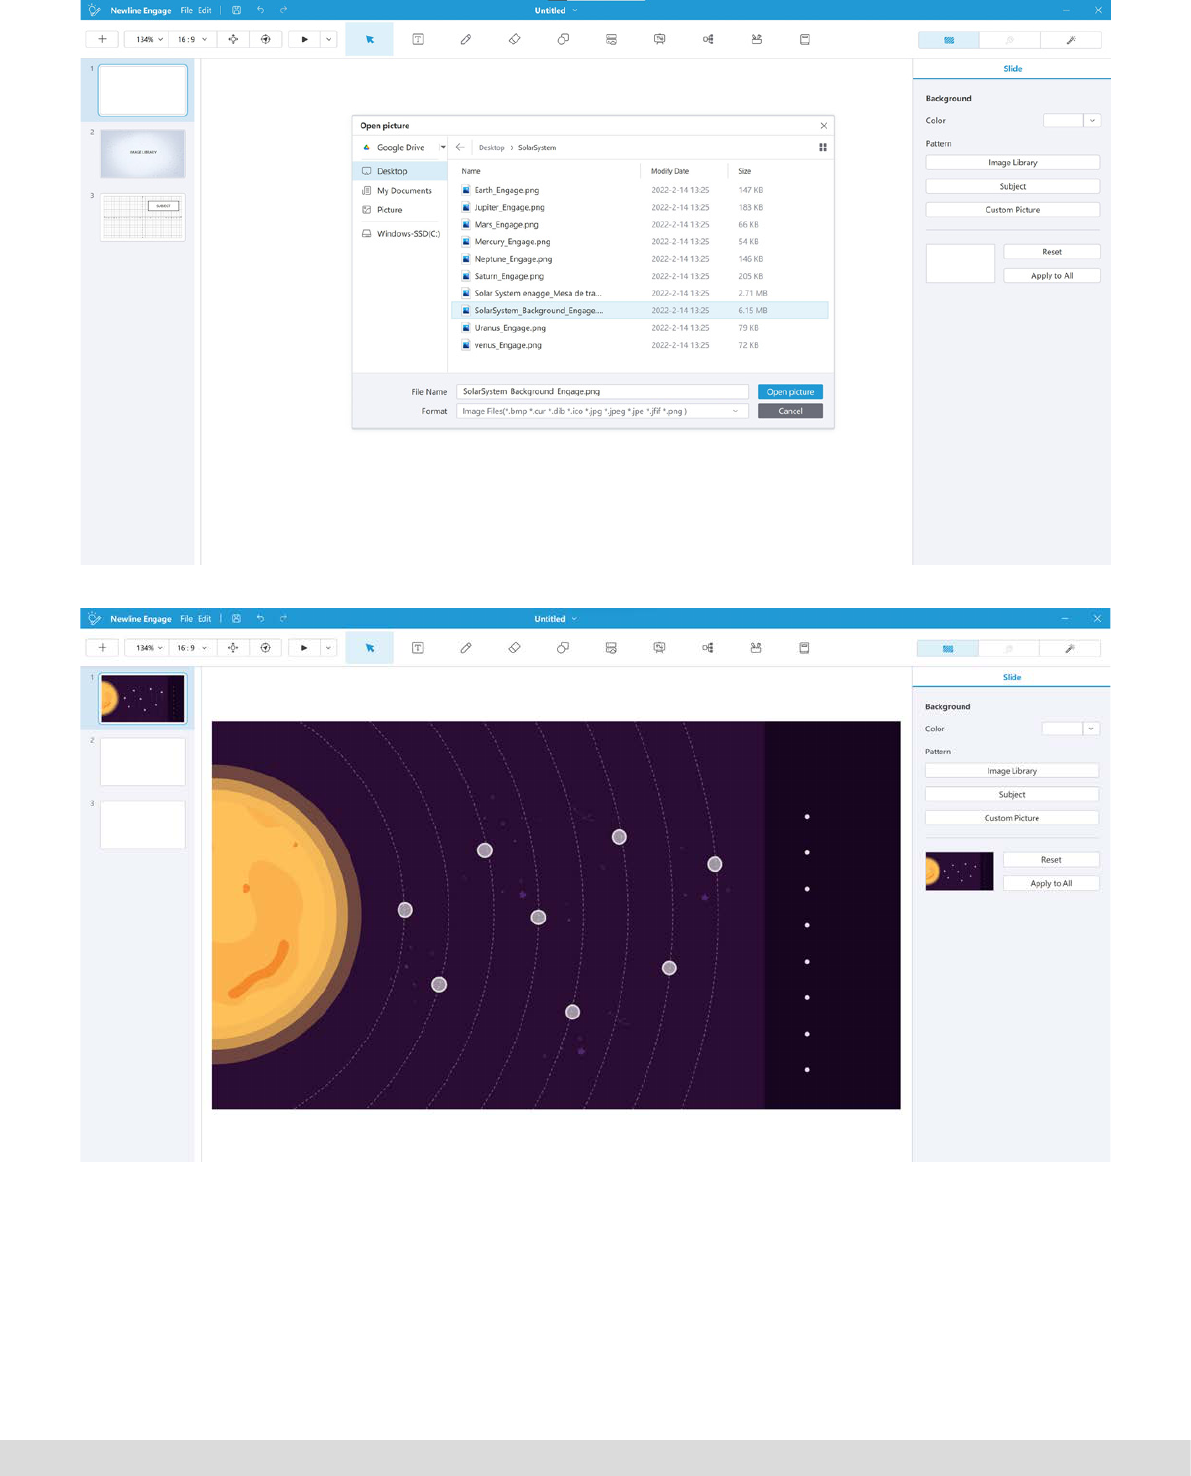
You can choose to select from the ima-
ge library, from the subject gallery orto
choose your own image as a back-
ground.
3.1 Setting a background
Image library Subject gallery
PAGE 9
www.newline-interactive.com/eu/
Choose your own image as a background

PAGE 10
www.newline-interactive.com/eu/
Select the text icon from the main toolbar.
Then click on the canvas where you would
like the text to be placed, you can edit the
text parameters using the Format tab on
the right hand side of the screen.
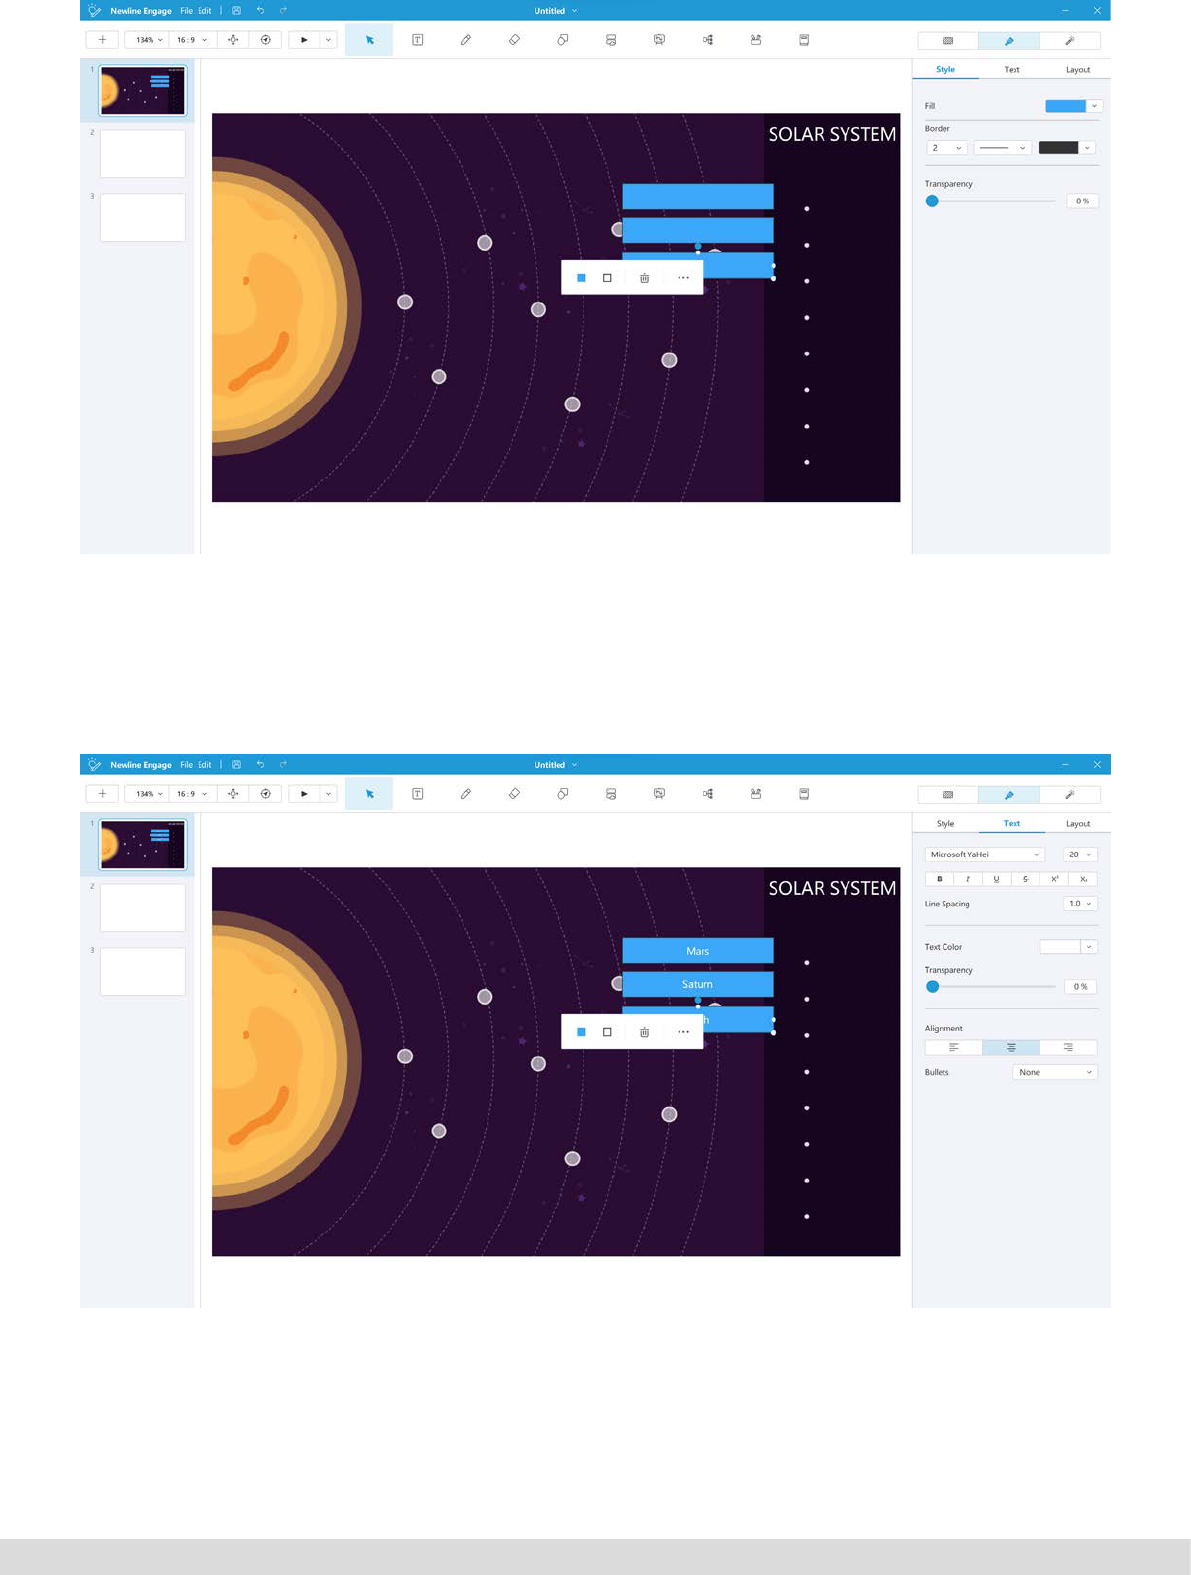
Select the shape tool icon from the main
toolbar.
3.2 Adding text
3.3 Adding shapes
Text icon
Shape tool iconSelect the shape required from the options
available, the parameters for the shape can
be customised using the Style tab on the
right hand side of the screen.
PAGE 11
www.newline-interactive.com/eu/
You can also add text into any shape by clicking on the shape and starting to type below you can see we
have now created labels for the planets
PAGE 12
www.newline-interactive.com/eu/
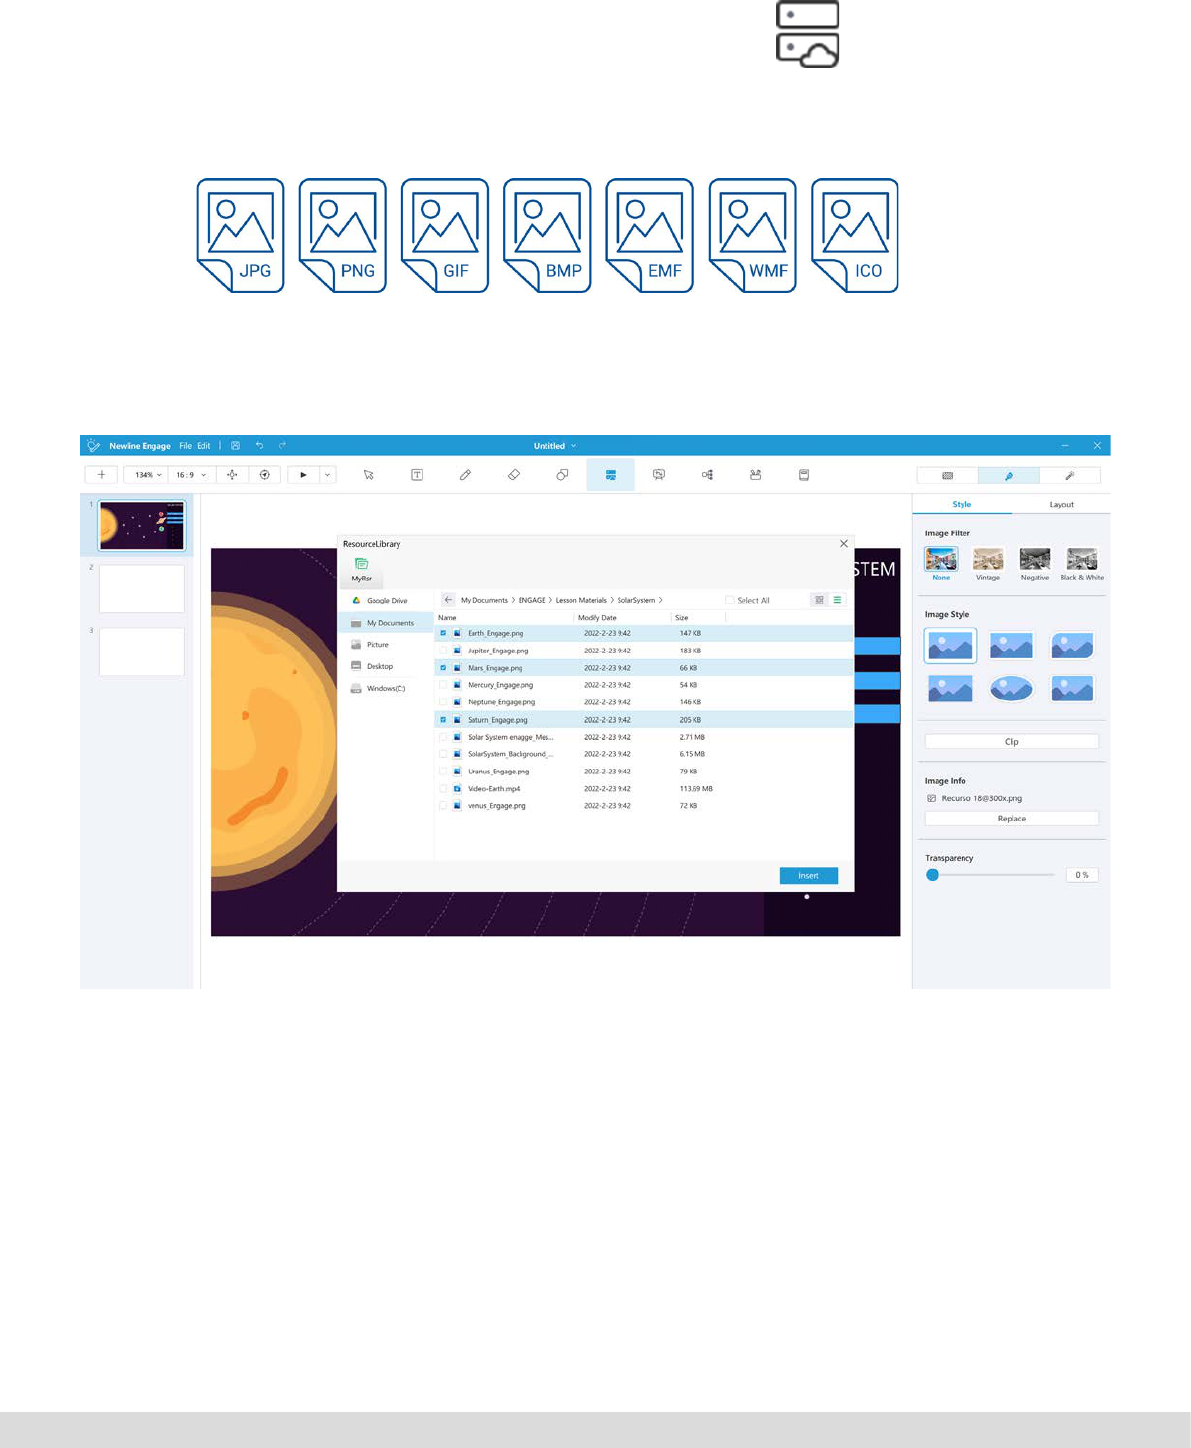
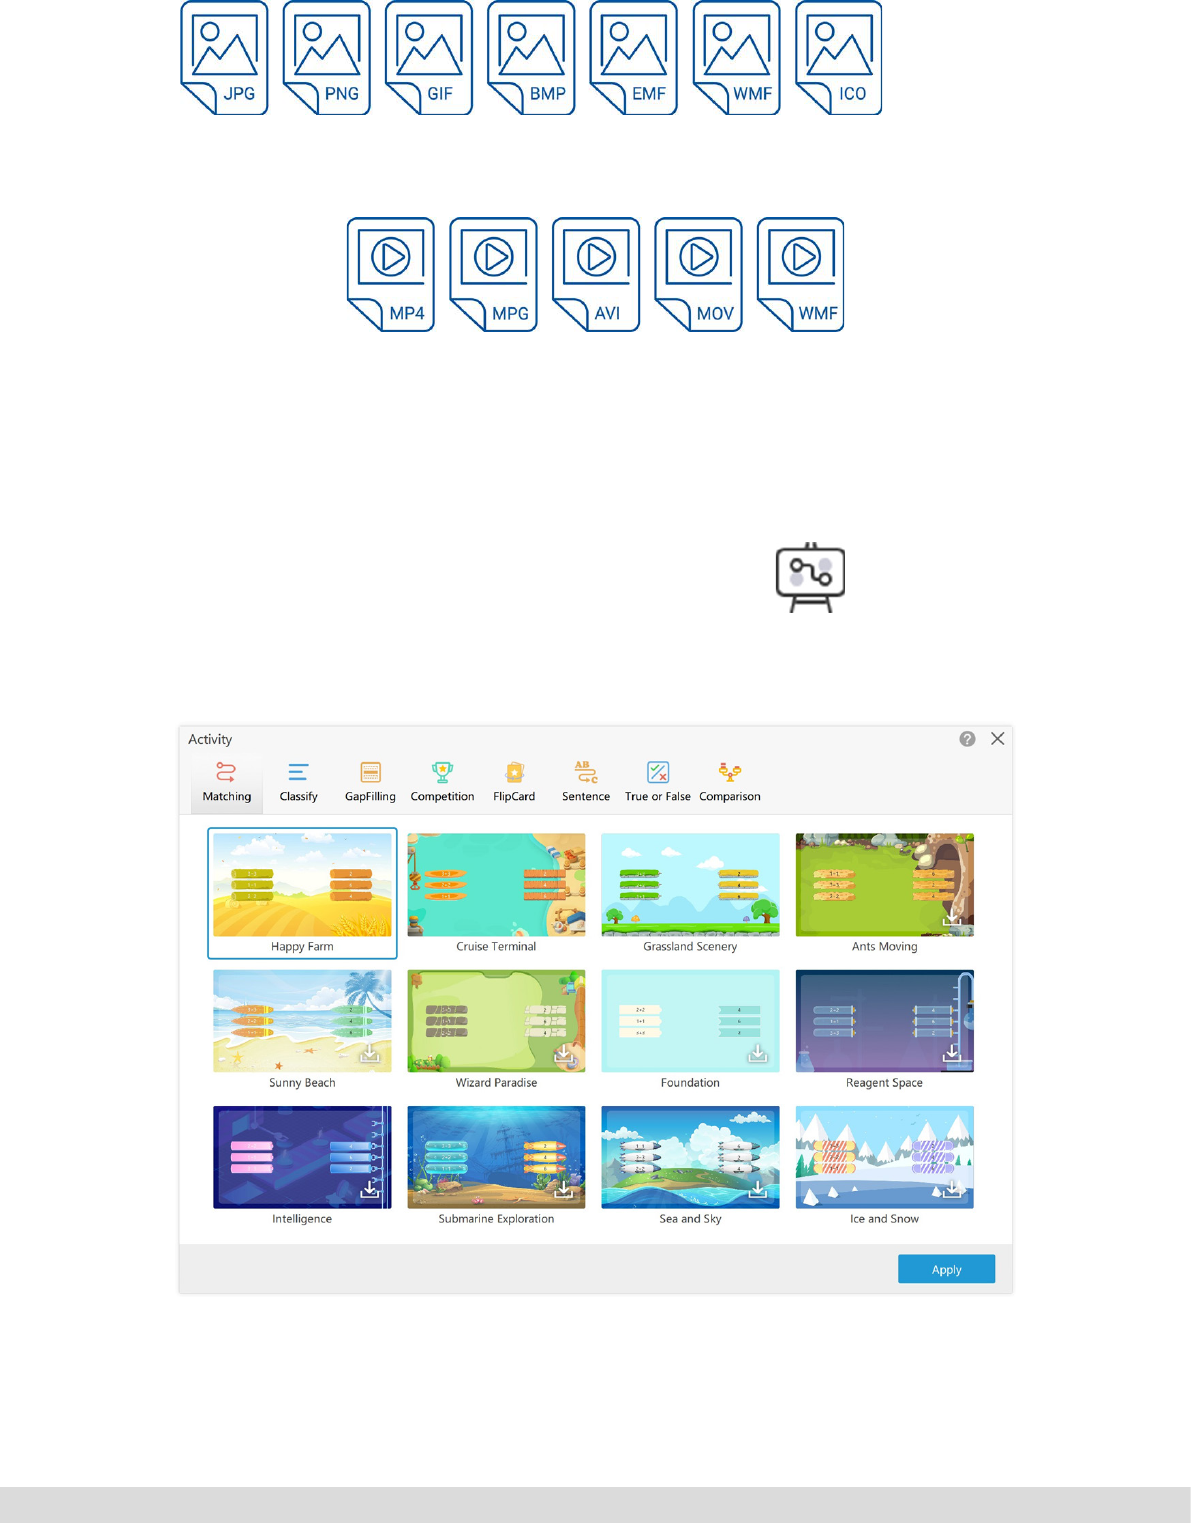
Select the resource icon from the main
toolbar and select the images you would
like to insert.
3.4 Adding images to the canvas
Resource tool icon
File formats supported
PAGE 13
www.newline-interactive.com/eu/
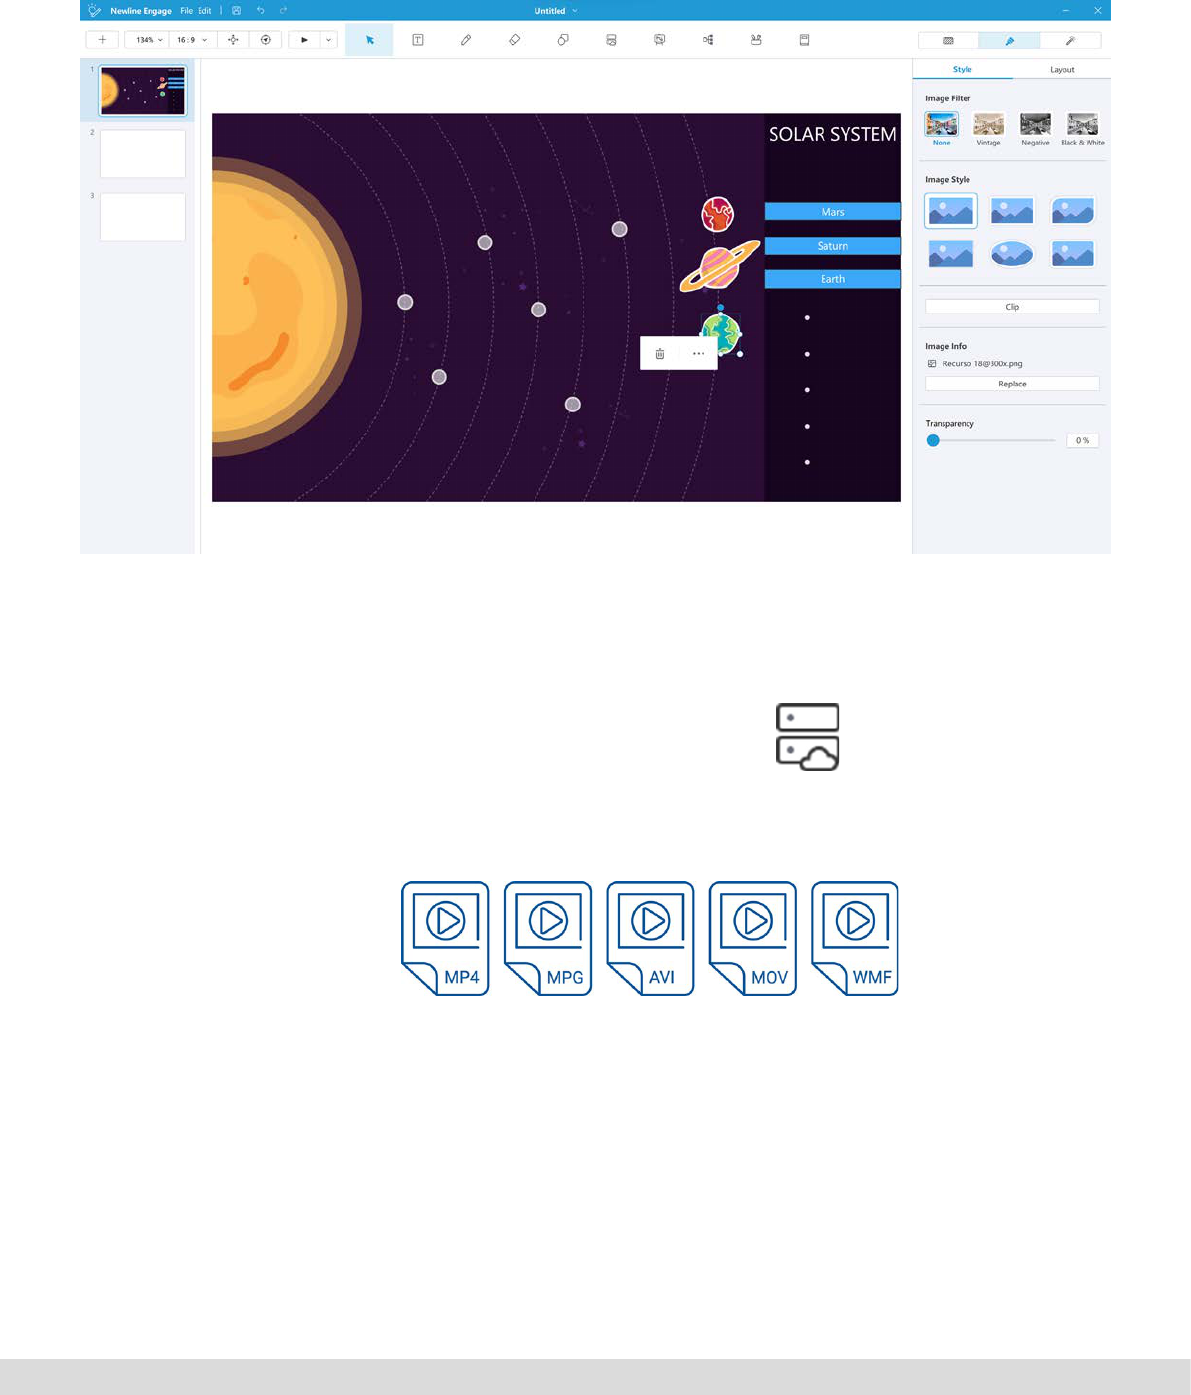
Select the resource icon from the main tool-
bar and select the video you would like to
insert the following formats are supported.
3.5 Adding video to the whiteboard canvas
Resource tool icon
These are then added to the whiteboard canvas and can be moved and resized with the mouse image
styles and lters can be added from the right hand style tab.
File formats supported

PAGE 14
www.newline-interactive.com/eu/
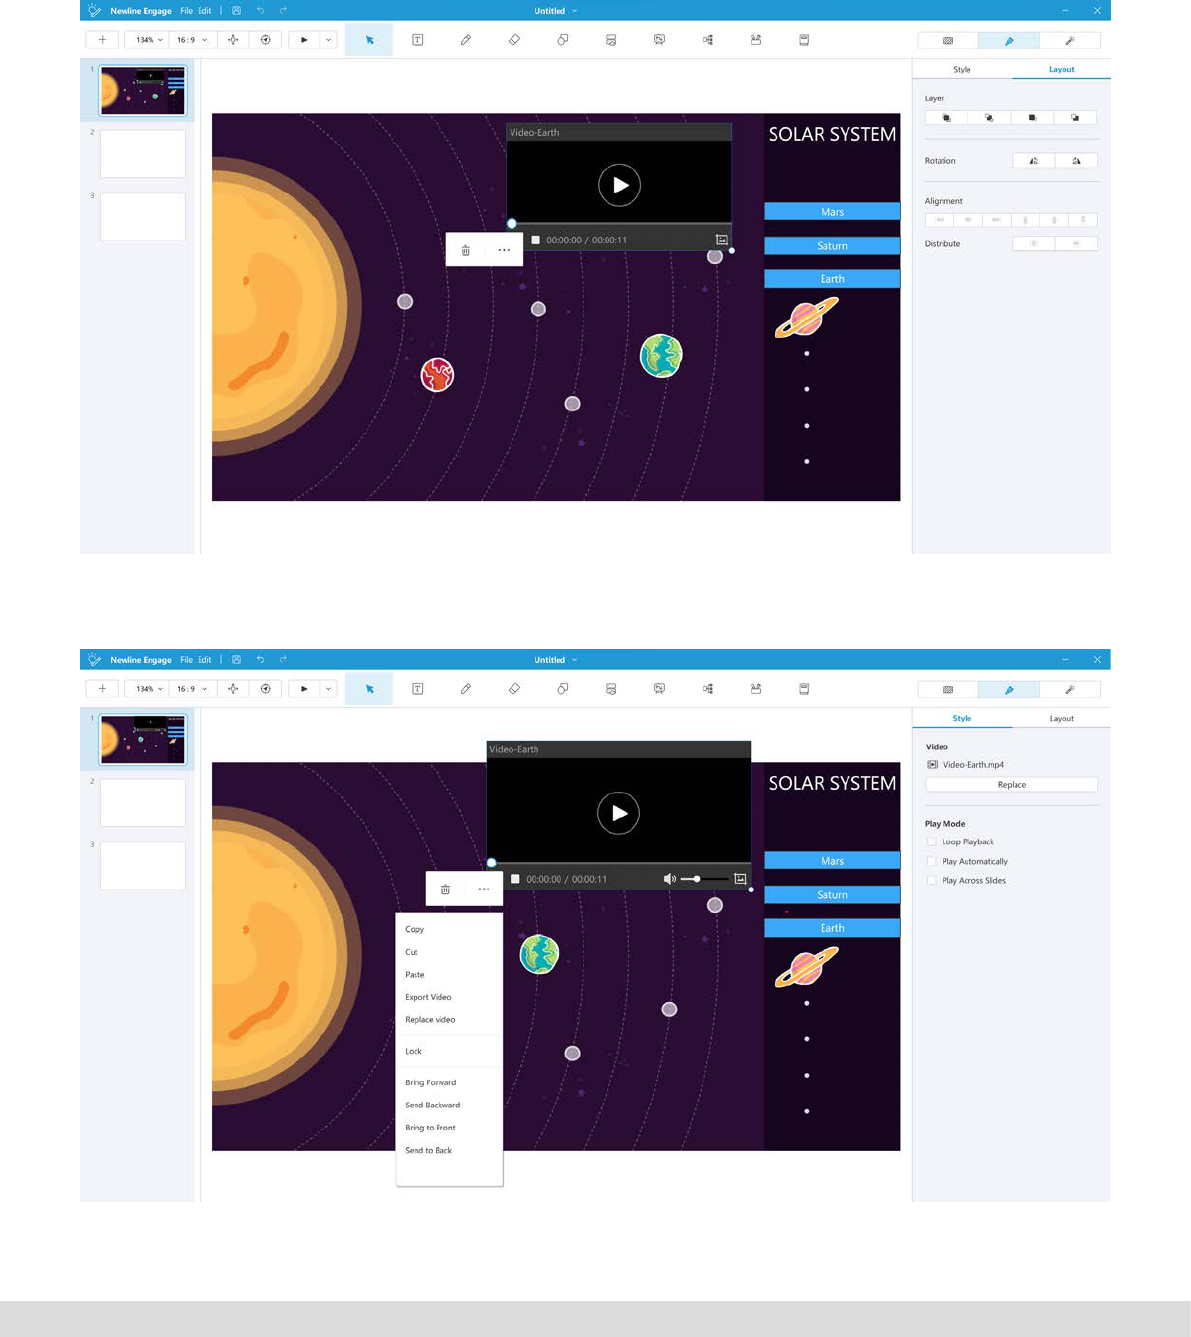
The video will be inserted onto the canvas, playback options can be selected in the style tab.
PAGE 15
www.newline-interactive.com/eu/
Objects on the stage can be moved around, and resized using the mouse, the ordering and alignment of
objects can be manipulated using the Layout tab on the right hand of the canvas.
Or by right clicking on the object or selecting the 3 edit dots on the object.
3.6 Arranging objects on the stage
PAGE 16
www.newline-interactive.com/eu/
4. OPENING AND SAVING YOUR FILES
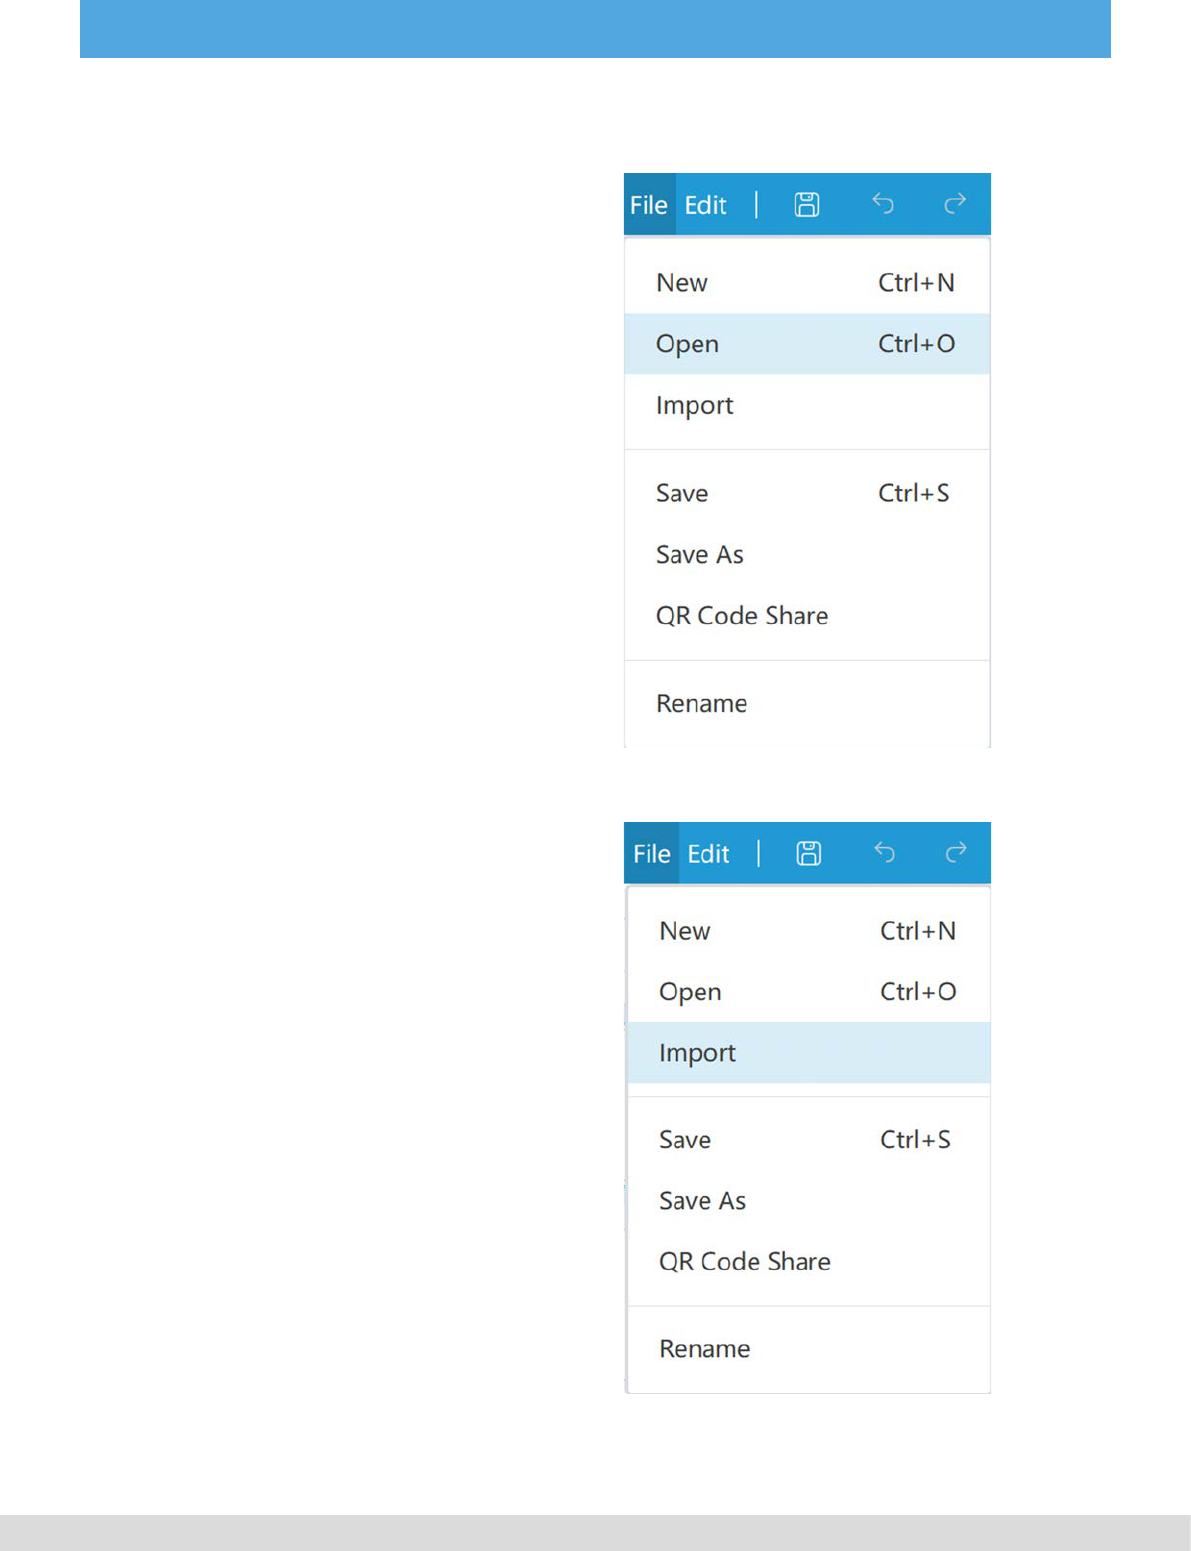
Select the “File” menu command and
then select “Open” you can then navi-
gate to where your les are stored and
open them from here, the newline le
format is called .hhtx this also means
you can bring in les from the Android
whiteboard app included with your pa-
nel.
Newline engage supports the direct im-
port of a wide variety of le formats to
make it easy for you to work with your
existing lesson resources,
4.1 Opening Newline Engage les
4.2 Importing other le formats
.ppt and .pptx - Microsoft PowerPoint les
.iwb - interactive white board the common
le format for all whiteboard software
.notebook - smart notebook
.flipchart - promethean flipcharts
.pdf - adobe pdf les
PAGE 17
www.newline-interactive.com/eu/
Newline engage allows you to save your
content in the following formats, select the
save icon or the “Save” option in the “File”
menu.
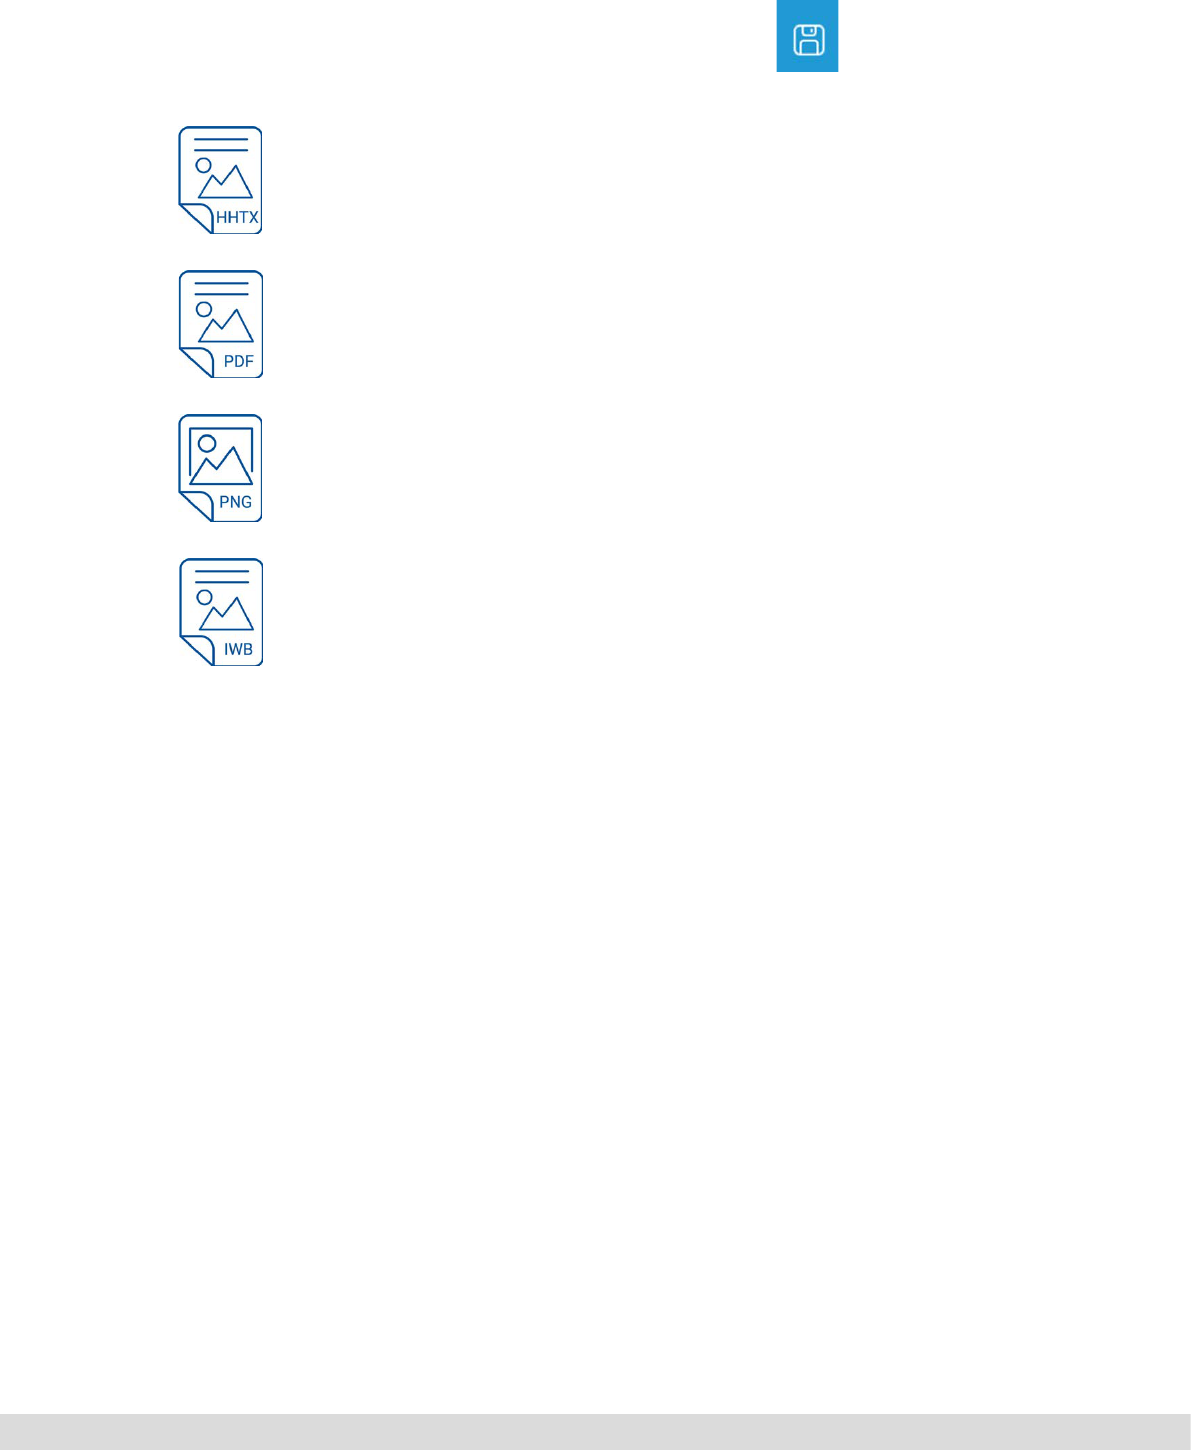
4.3 Saving your lesson
Save icon
Courseware - .hhtx the native format for newline engage
PDF - .pdf the Adobe acrobat le format
PNG - .PNG image le
IWB - .IWB the internationally recognised common le format for whiteboards
PAGE 18
www.newline-interactive.com/eu/
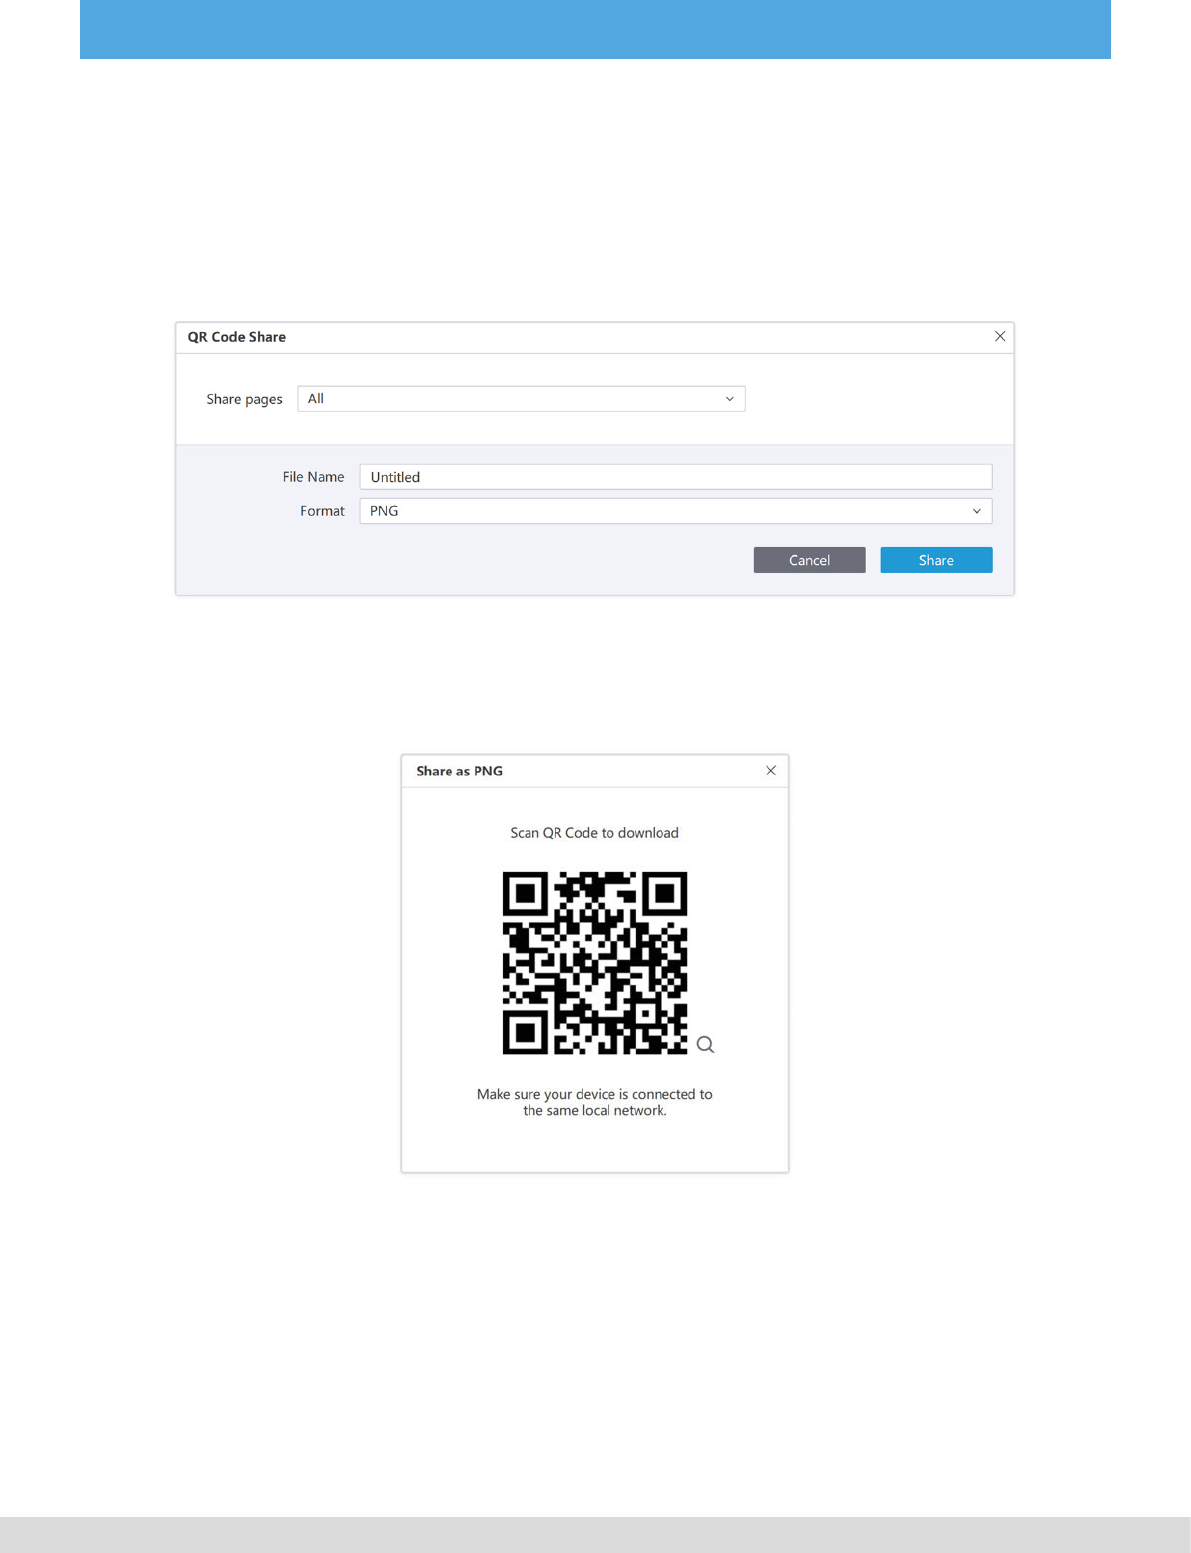
5. SHARING YOUR LESSON
Newline engage also supports the quick sharing of les using a QR code to allow them to be directly and
quickly saved to a mobile device.
Selecting the QR code option will allow you to select which pages you want to share as well as the format
you want to share them in, options include .PNG (Image File) .JPEG ( Image File) .PDF (Adobe acrobat).
After selecting the format required a QR code will be displayed which can be scanned to download the le
directly to your mobile device.
PAGE 19
www.newline-interactive.com/eu/
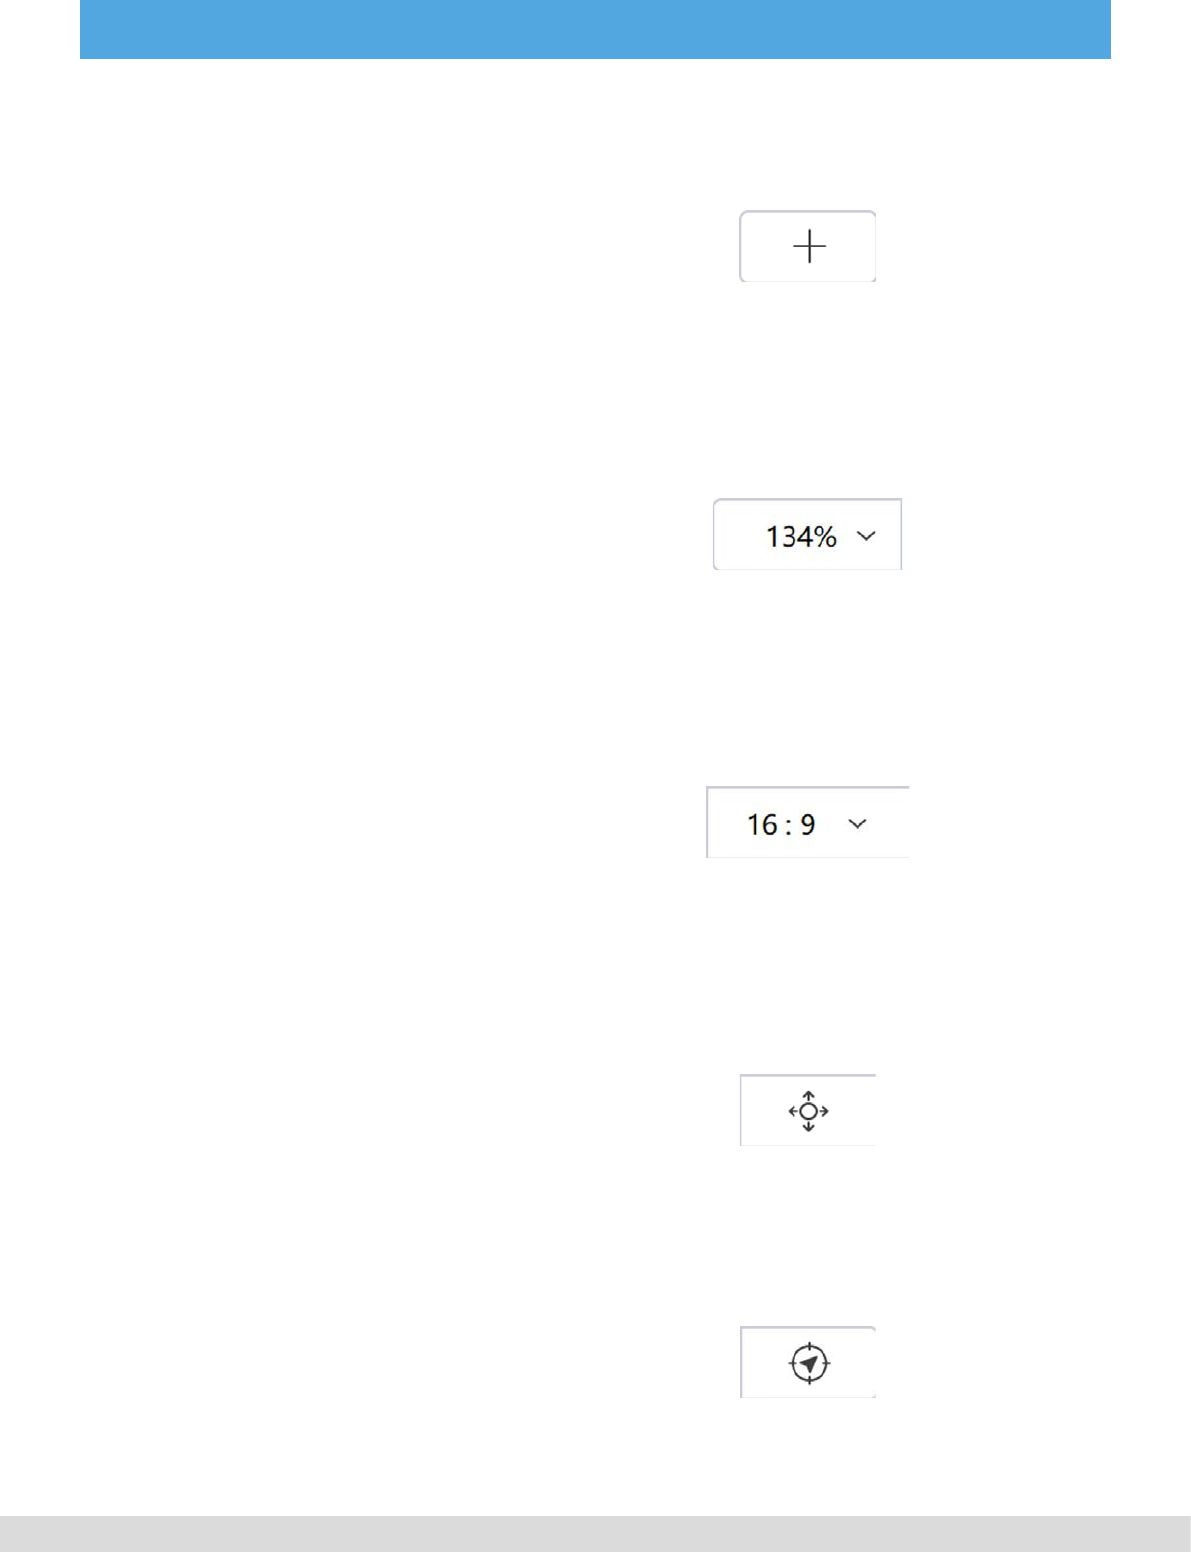
6. MAIN TOOLBAR /PREPARATION MODE
This adds a blank page to the whiteboard
canvas, pages can be moved up and down
in the page sorter by selecting and drag-
ging them.
This allows you to zoom in or out of the
canvas this is useful when the canvas
has grown in size and you want to view
everything on one page.
This allows you to select the screen format
this could be useful if you want to display
your content in a format, options are 16:9 -
4:3 - 16:10.
This allows you to move around the can-
vas and expand it from what is visible on
the screen.
This resets the whiteboard canvas to its
original starting position.
6.1 Add Page
6.2 Zoom
6.3 Screen Format
6.4 Move
6.5 Reset
Add page tool
Zoom tool
Screen Format tool
Move tool
Reset tool

PAGE 20
www.newline-interactive.com/eu/
This moves the display mode from prepa-
ration mode to presentation mode.
This allows you to select and interact with
menu and canvas objects.
This allows you to ink on the whiteboard
canvas with a variety of pens.
This allows you to move around the can-
vas and expand it from what is visible on
the screen.
6.6 Start Presentation
6.7 Select Mode
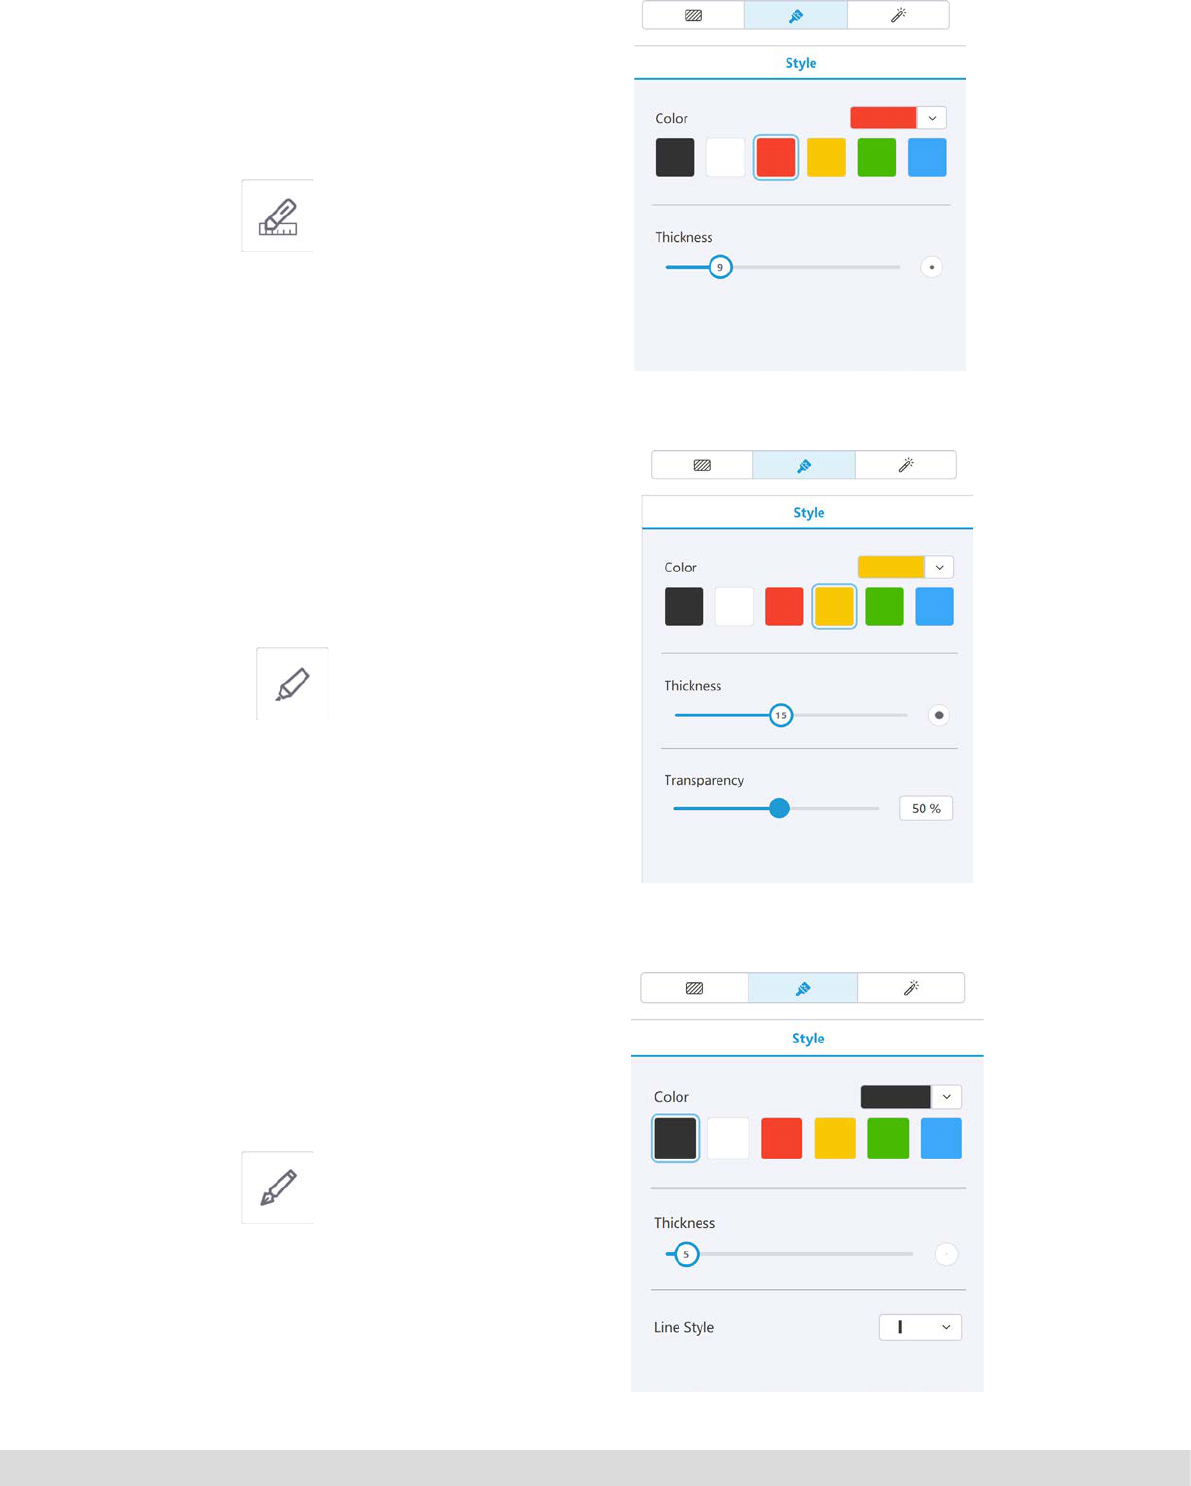
6.8 Pen Tools
6.8.1 Standard pen
Start Presentation tool
Select tool
Pen tool
PAGE 21
www.newline-interactive.com/eu/
The shape pen will automatically turn hand
drawn shapes into, lines, squares, circles,
triangles offering option for colour and line
thickness.
Highlight text and images with this pen,
offering options for colour, thickness and
transparency.
Stylised pen offering options for, colour,
thickness and line style to create a calligra-
phic effect.
6.8.2 Shape pen
6.8.3 High lighter pen
6.8.4 Calligraphy pen
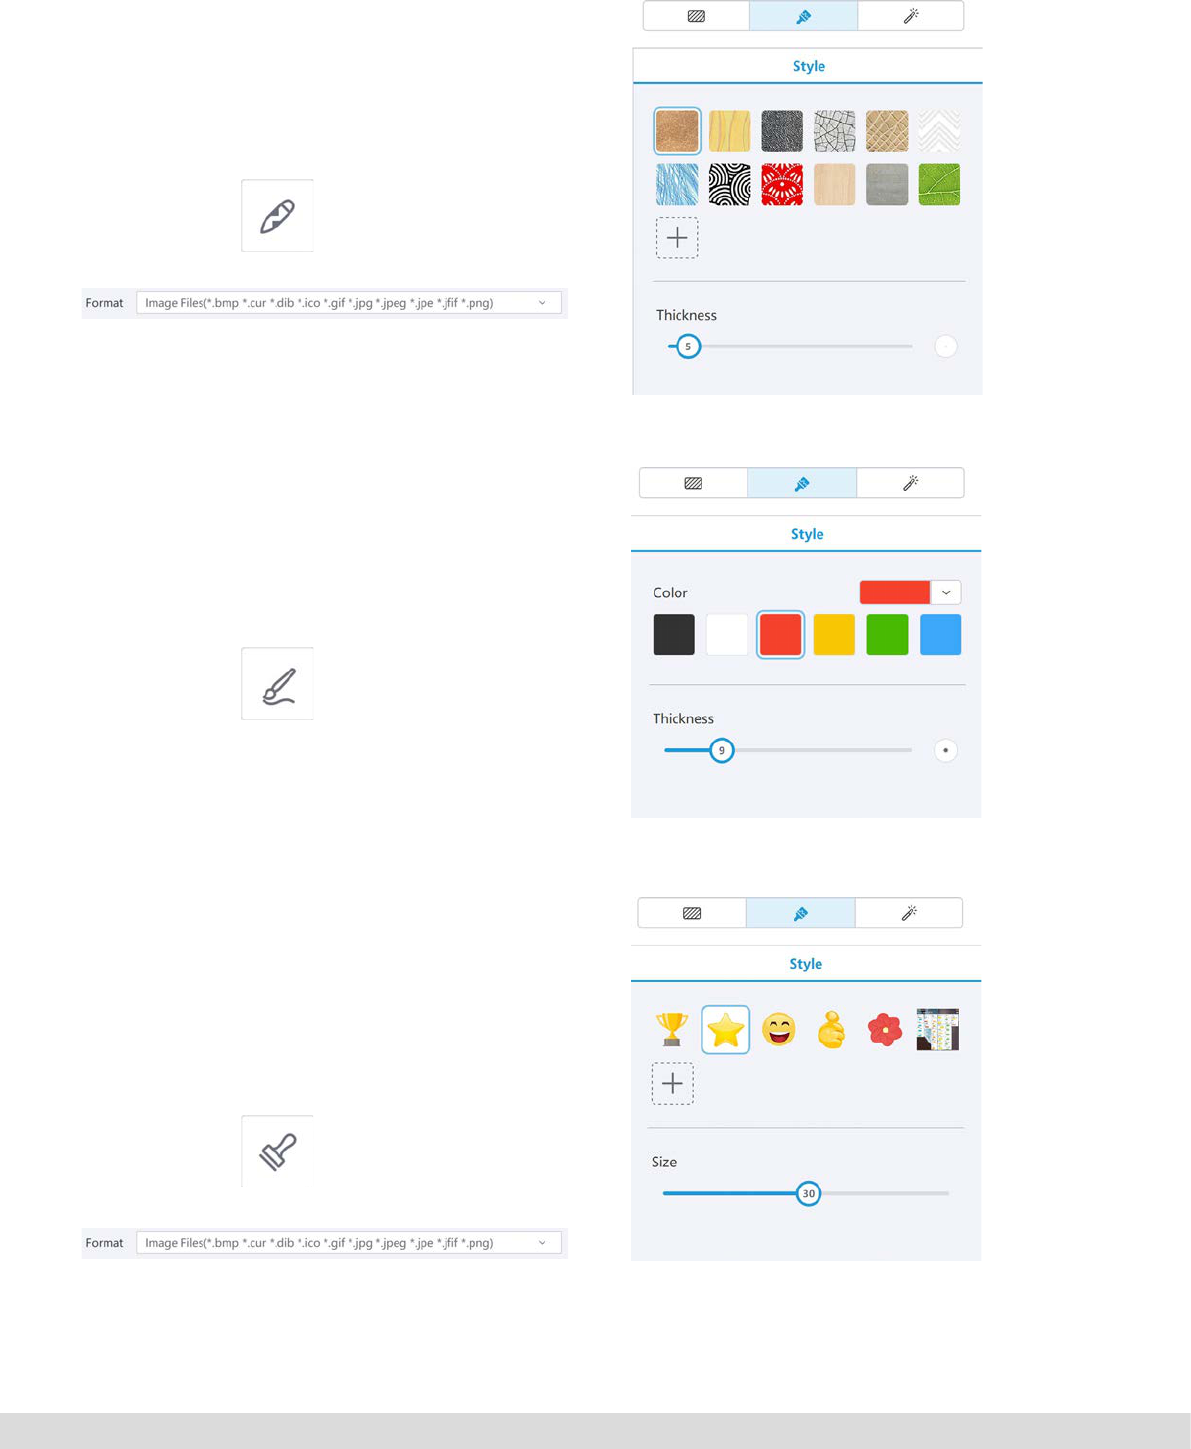
PAGE 22
www.newline-interactive.com/eu/
Allows you to draw with with a pattern,
offering options of some preset patterns
and the ability to add your own images, su-
pports the following formats.
This pen makes your ink look like its been
painted on the canvas, offering options for
colour and thickness.
Offers the ability to stamp images / emojis
onto the canvas, offering options for pre-
set images and the ability to add your own
images, supports the following formats.
6.8.5 Pattern pen
6.8.6 Paint brush
6.8.7 Stamp
PAGE 23
www.newline-interactive.com/eu/
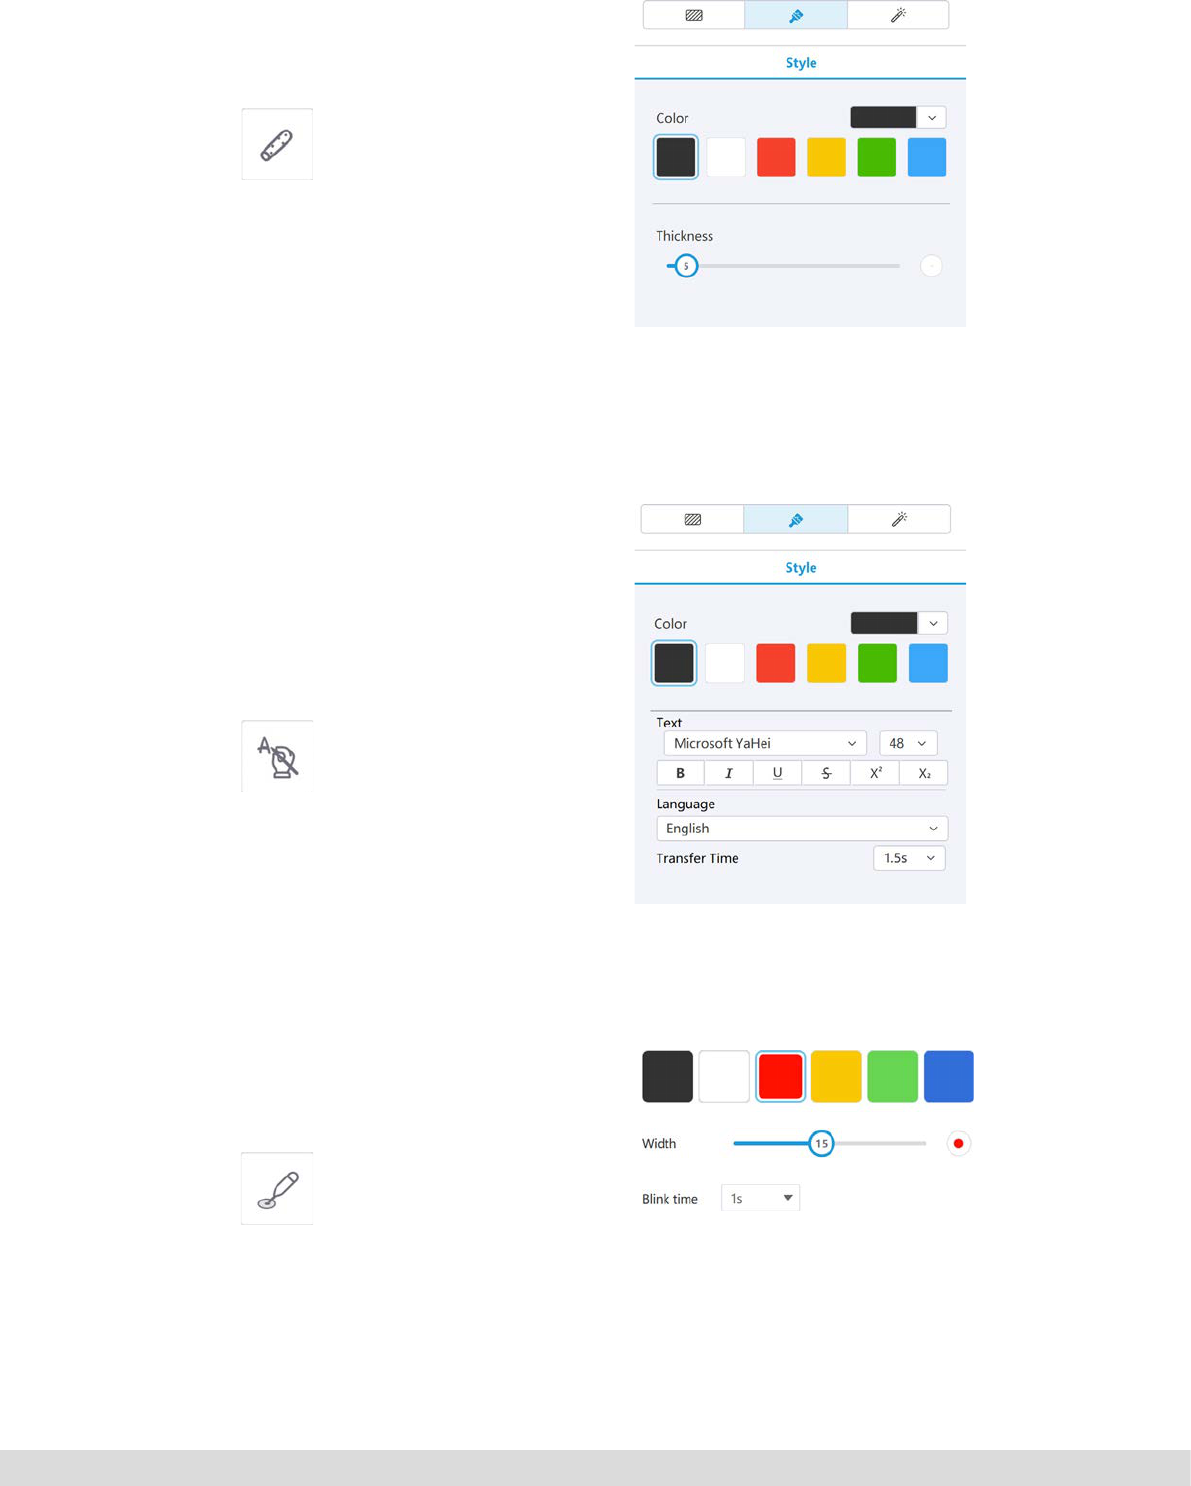
Simulates chalk on a blackboard effect,
offering options for colour and chalk thic-
kness.
Converts hand written ink into text, offering
options for colour, font, and transfer times,
supports the following languages. English,
French, Dutch, Spanish, Japanese, Korean
and Chinese.
Offers the ability for the pen drawn ink to
flash, offering options for colour, and blink
time.
6.8.8 Chalk
6.8.9 Handwriting recognition
6.8.10 Laser ink pen / Only available in presentation mode
PAGE 24
www.newline-interactive.com/eu/
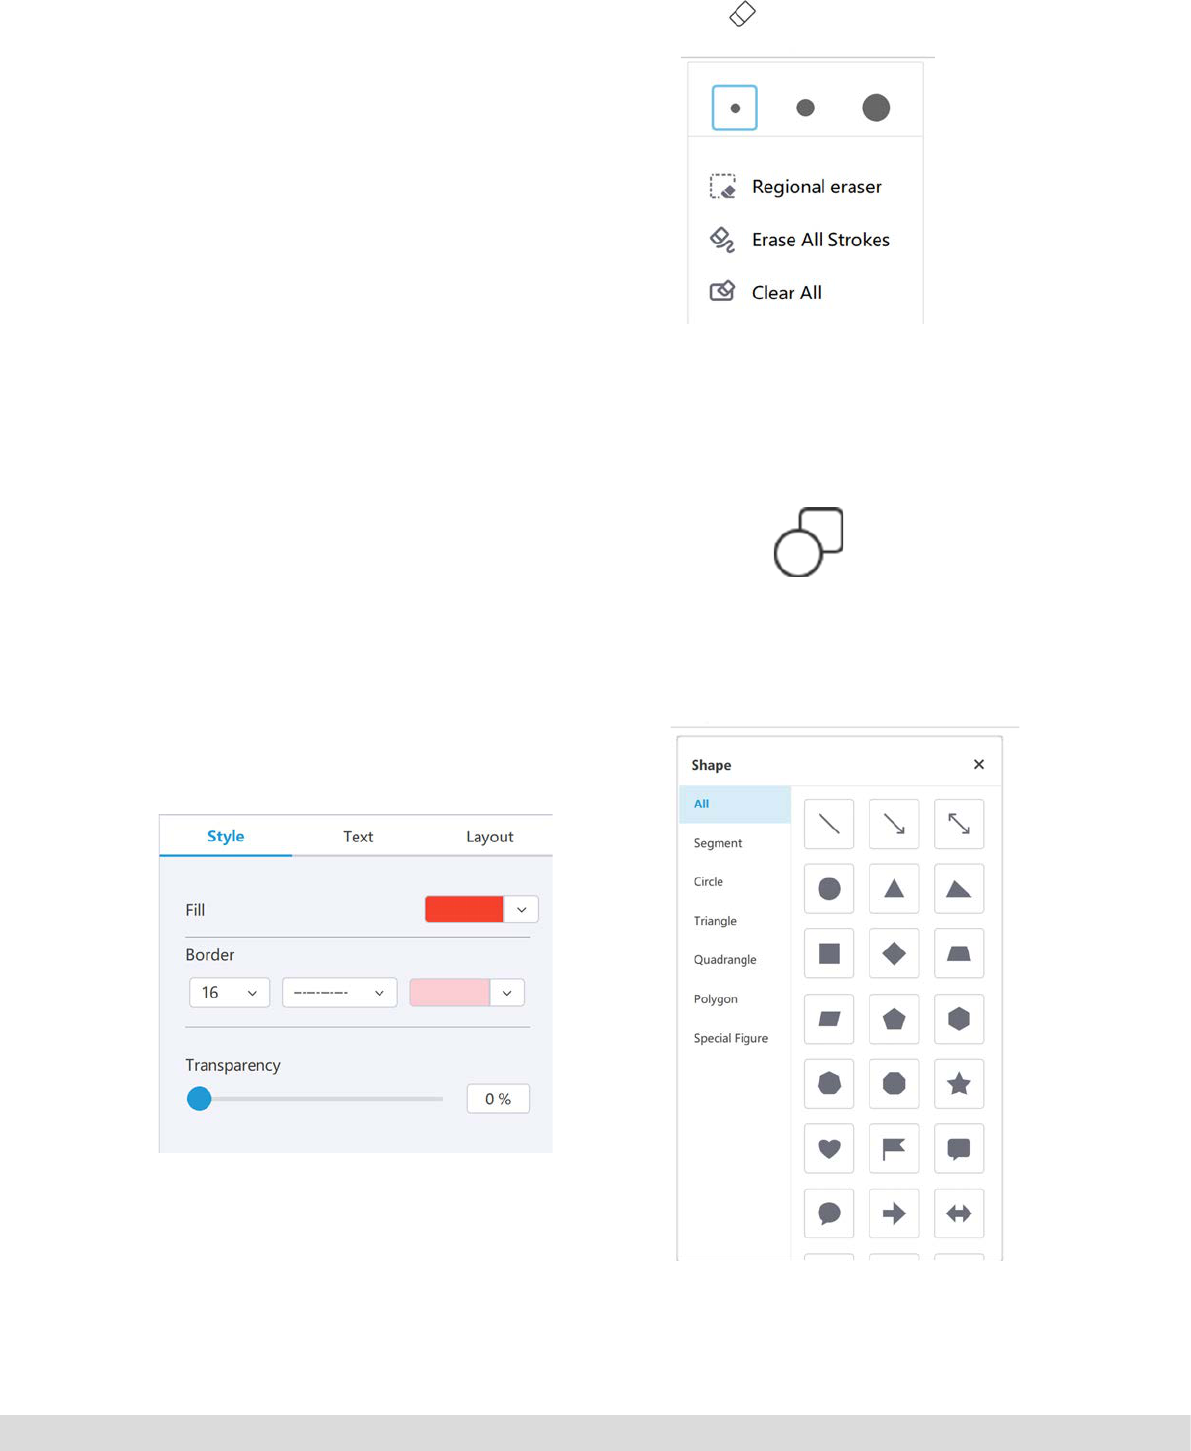
This tool is used to erase any ink drawn
on the whiteboard canvas, you can adjust
the size of the eraser, erase only a certain
region on the screen, erase all ink on the
page, or clear all the page contents.
The shape tool allows you to add a wide
selection of lines and shapes quickly to the
whiteboard canvas, you are able to adjust
shape colour, border colour, border style,
border width, and shape transparency after
the object has been added to the canvas,
you can also add text into a shape.
6.9 Eraser tool
6.10 Shape tool
Eraser tool
Shape tool
Shape style options
PAGE 25
www.newline-interactive.com/eu/
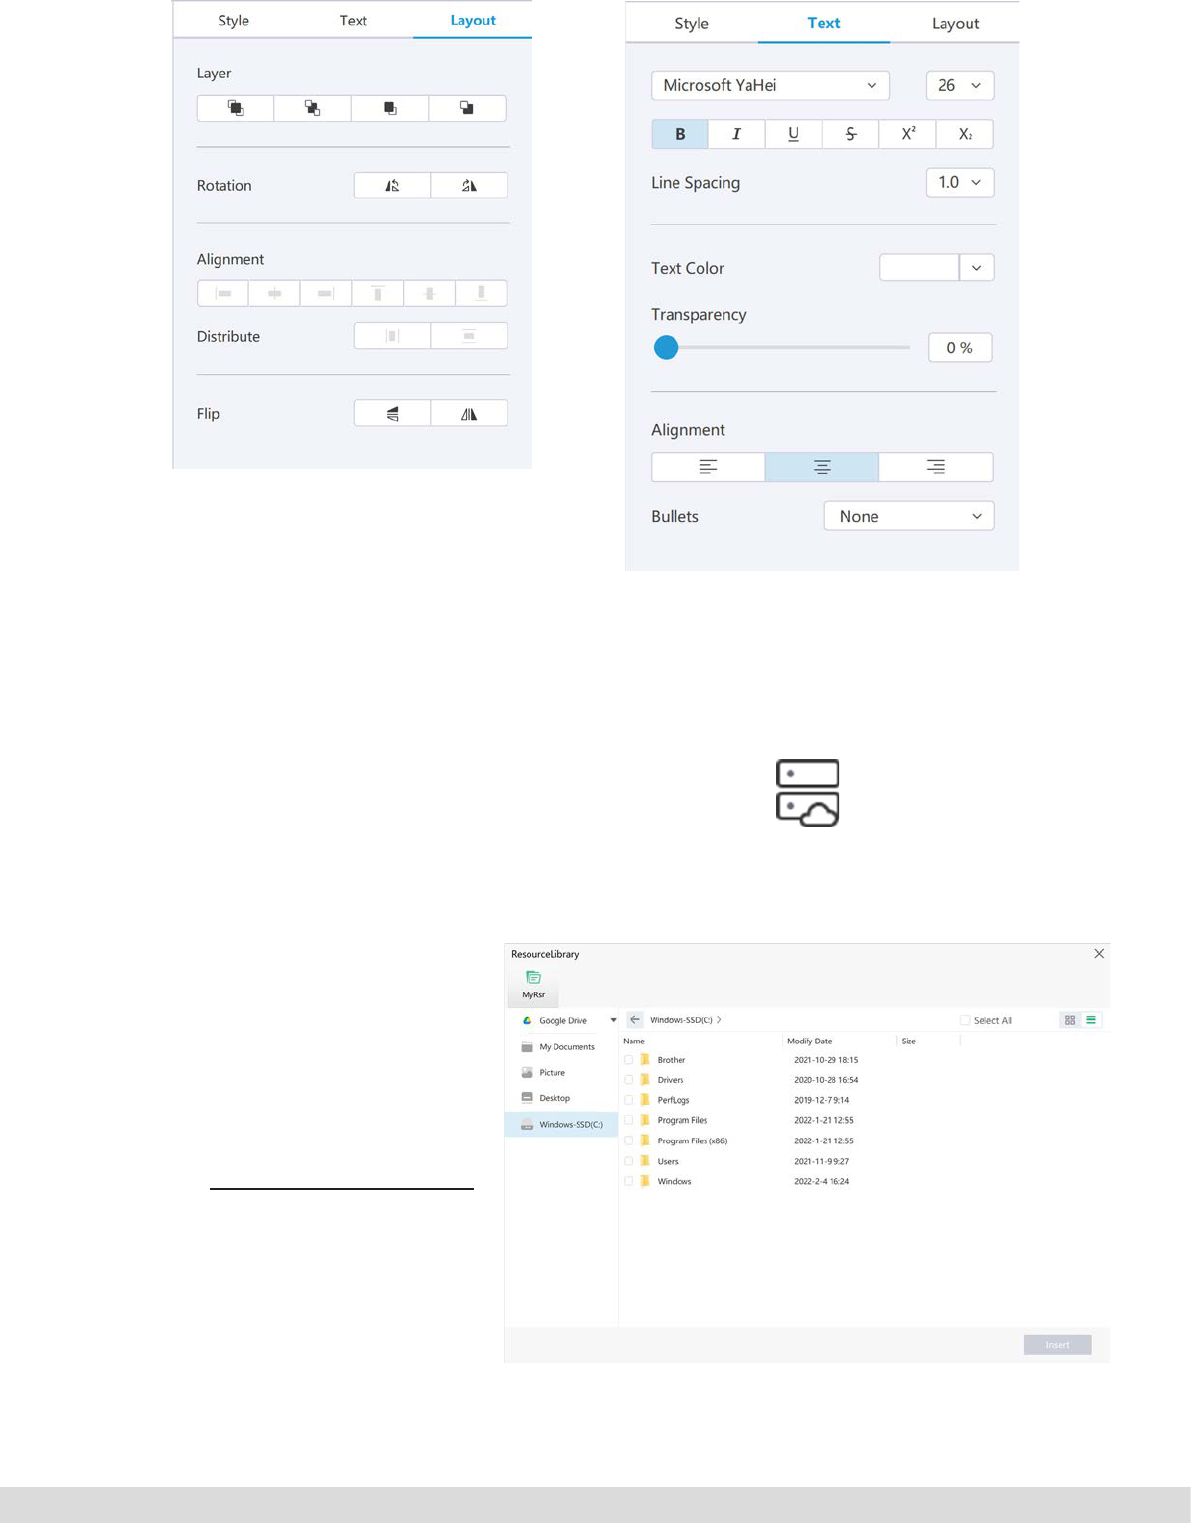
Shape style options
Shape text options
Select this icon to browser your local desk-
top, google drive, and then select the sour-
ce and resource you want to add to the whi-
teboard canvas.
6.11 Resource
Resource tool icon
Please note
Documents added to the whiteboard from the
resource icon will be added to the document as
a link this allows you to add any document type
to the whiteboard the application the documents
were created in will be launched when the docu-
ments are clicked on.
PAGE 26
www.newline-interactive.com/eu/
This allows you to add a wide range of inte-
ractive activities into your lesson.
6.12 Interactive templates
Video formats supported
Image formats supported
PAGE 27
www.newline-interactive.com/eu/
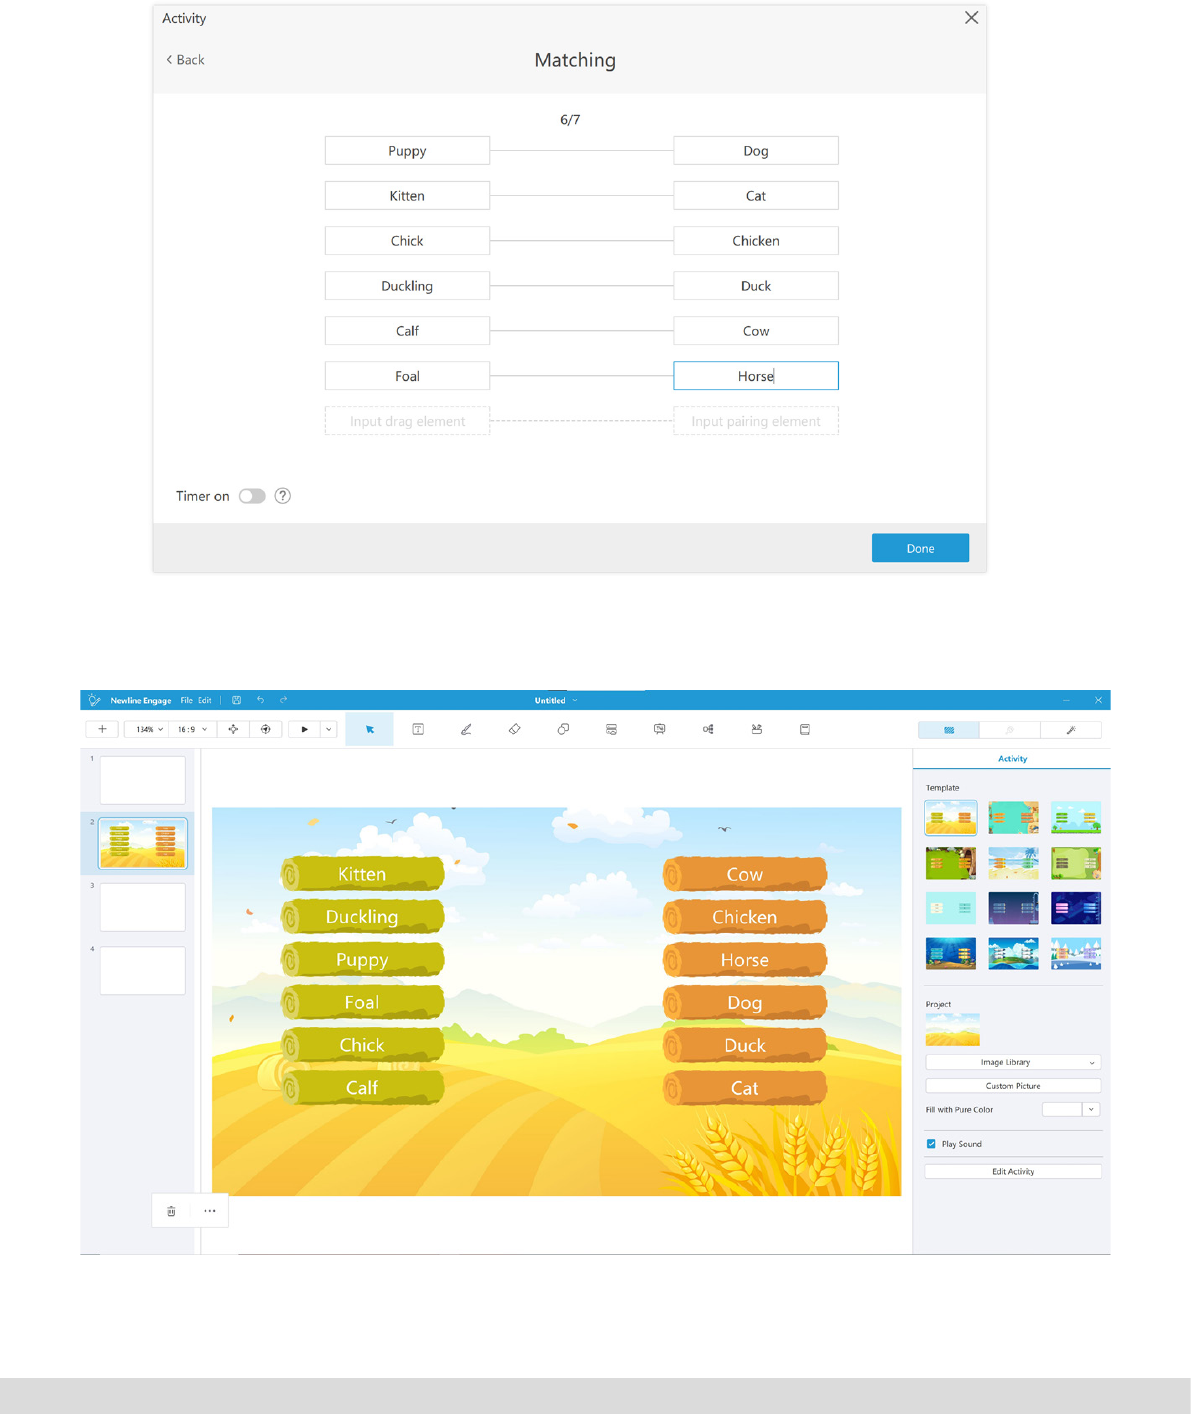
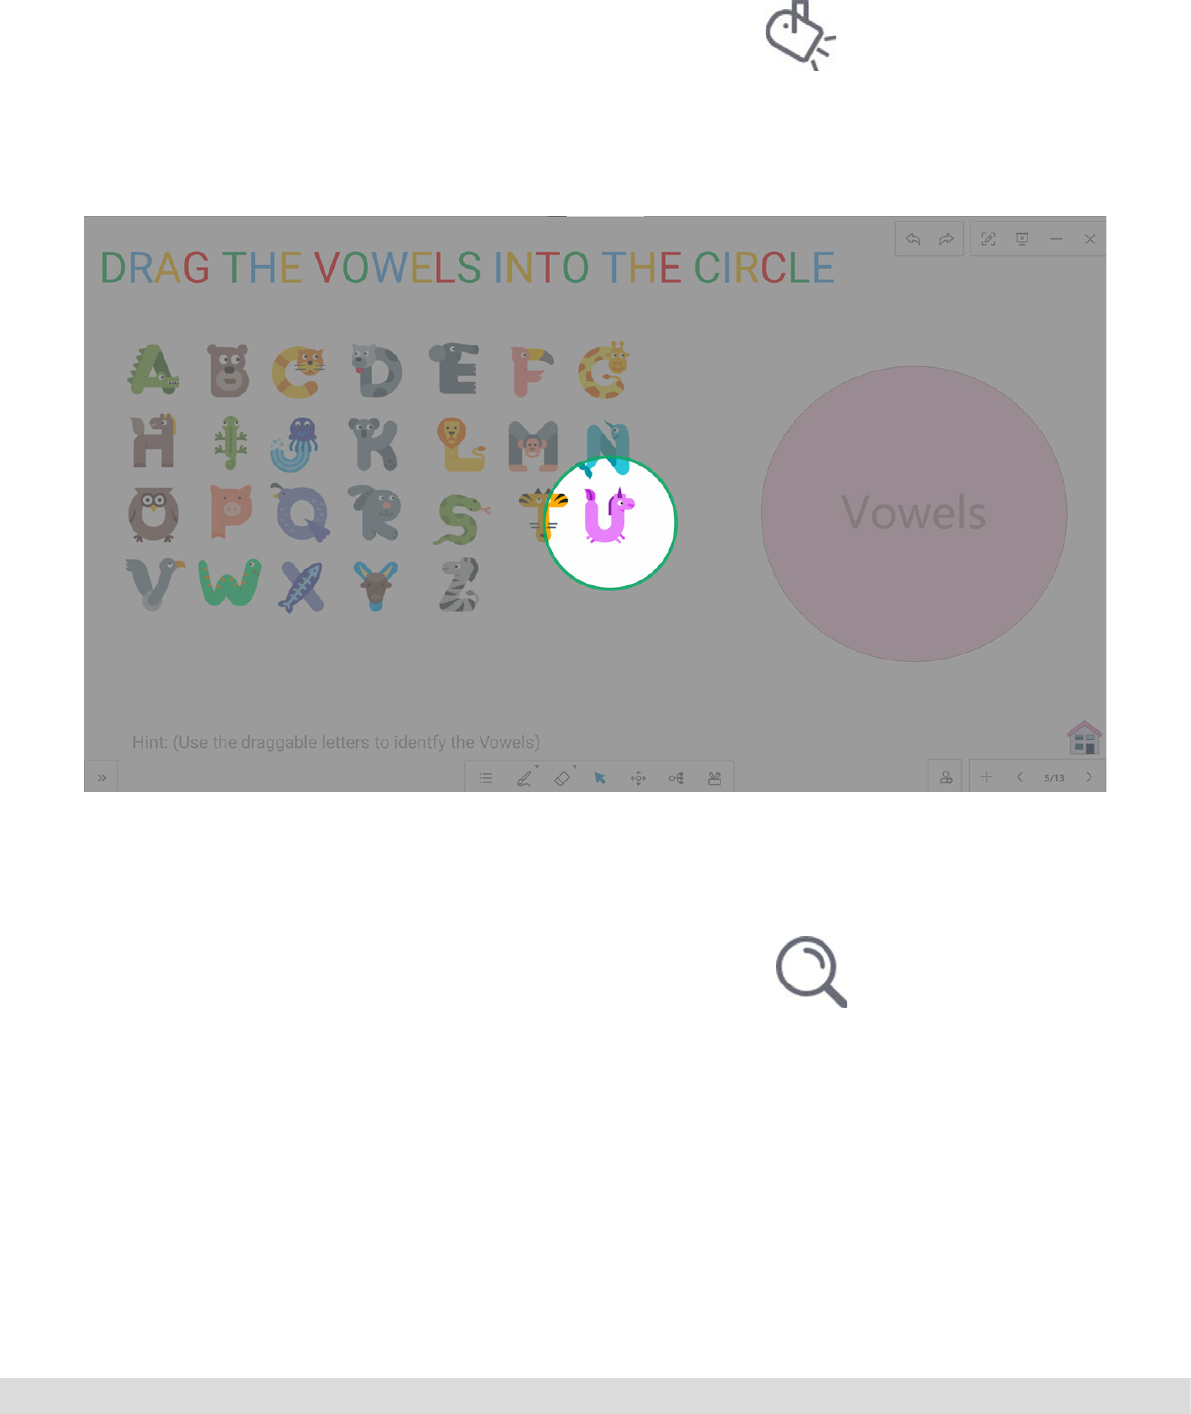
Once selected enter the relevant information required for the activity below is an example
of the matching activity.
When entered the activity will be placed on the whiteboard canvas
PAGE 28
www.newline-interactive.com/eu/
You are able to customise this further using the right hand side panel, please note the activity can only be
played in the presentation mode.
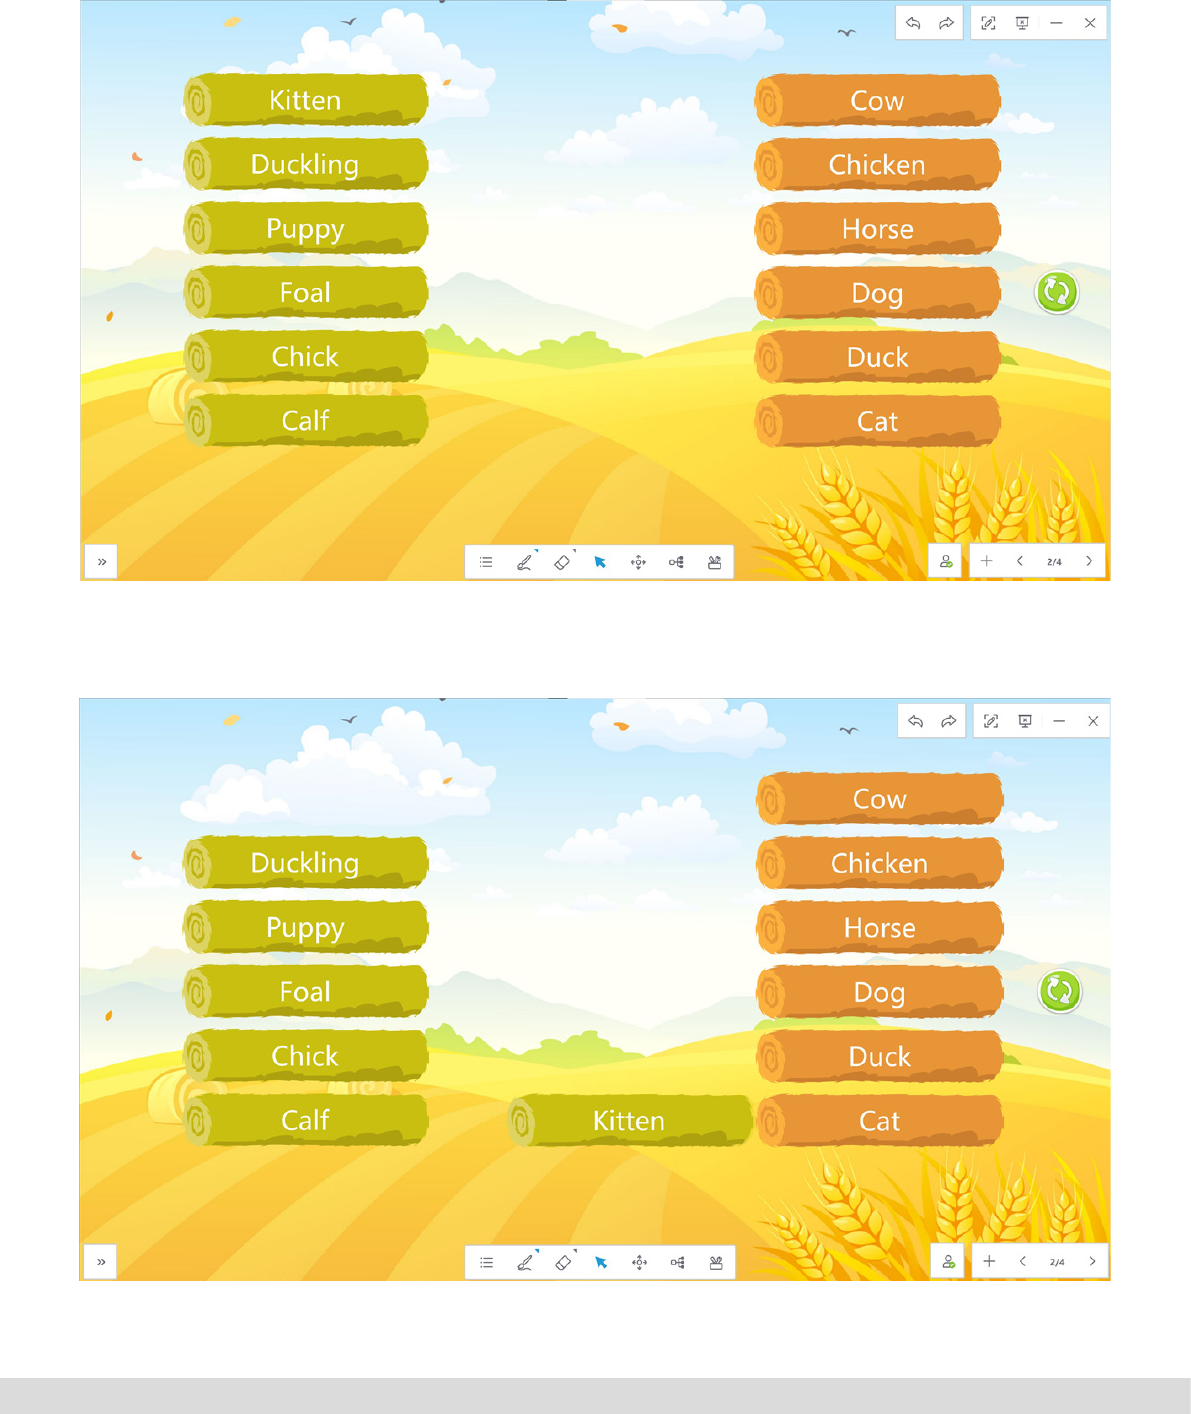
In this matching activity example drag the answer to the correct answer
PAGE 29
www.newline-interactive.com/eu/
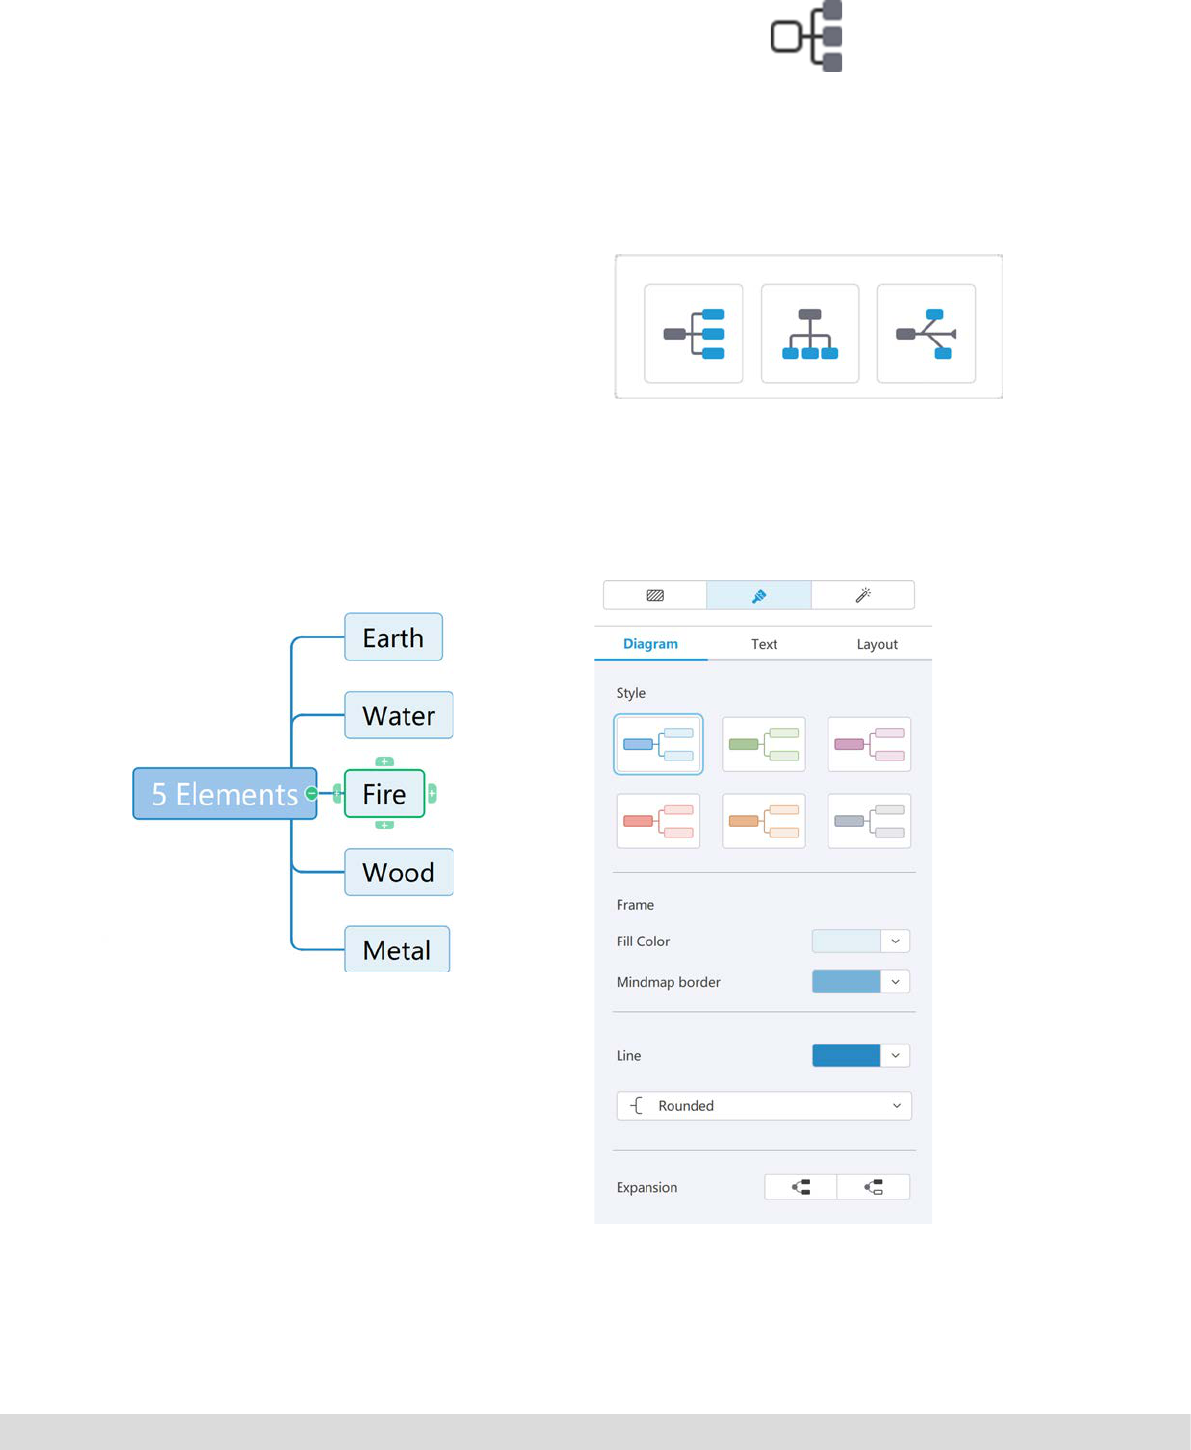
Easily add concept mapping diagrams into
your canvas, these can be prepopulated but
can be added to on the fly during the
lesson.
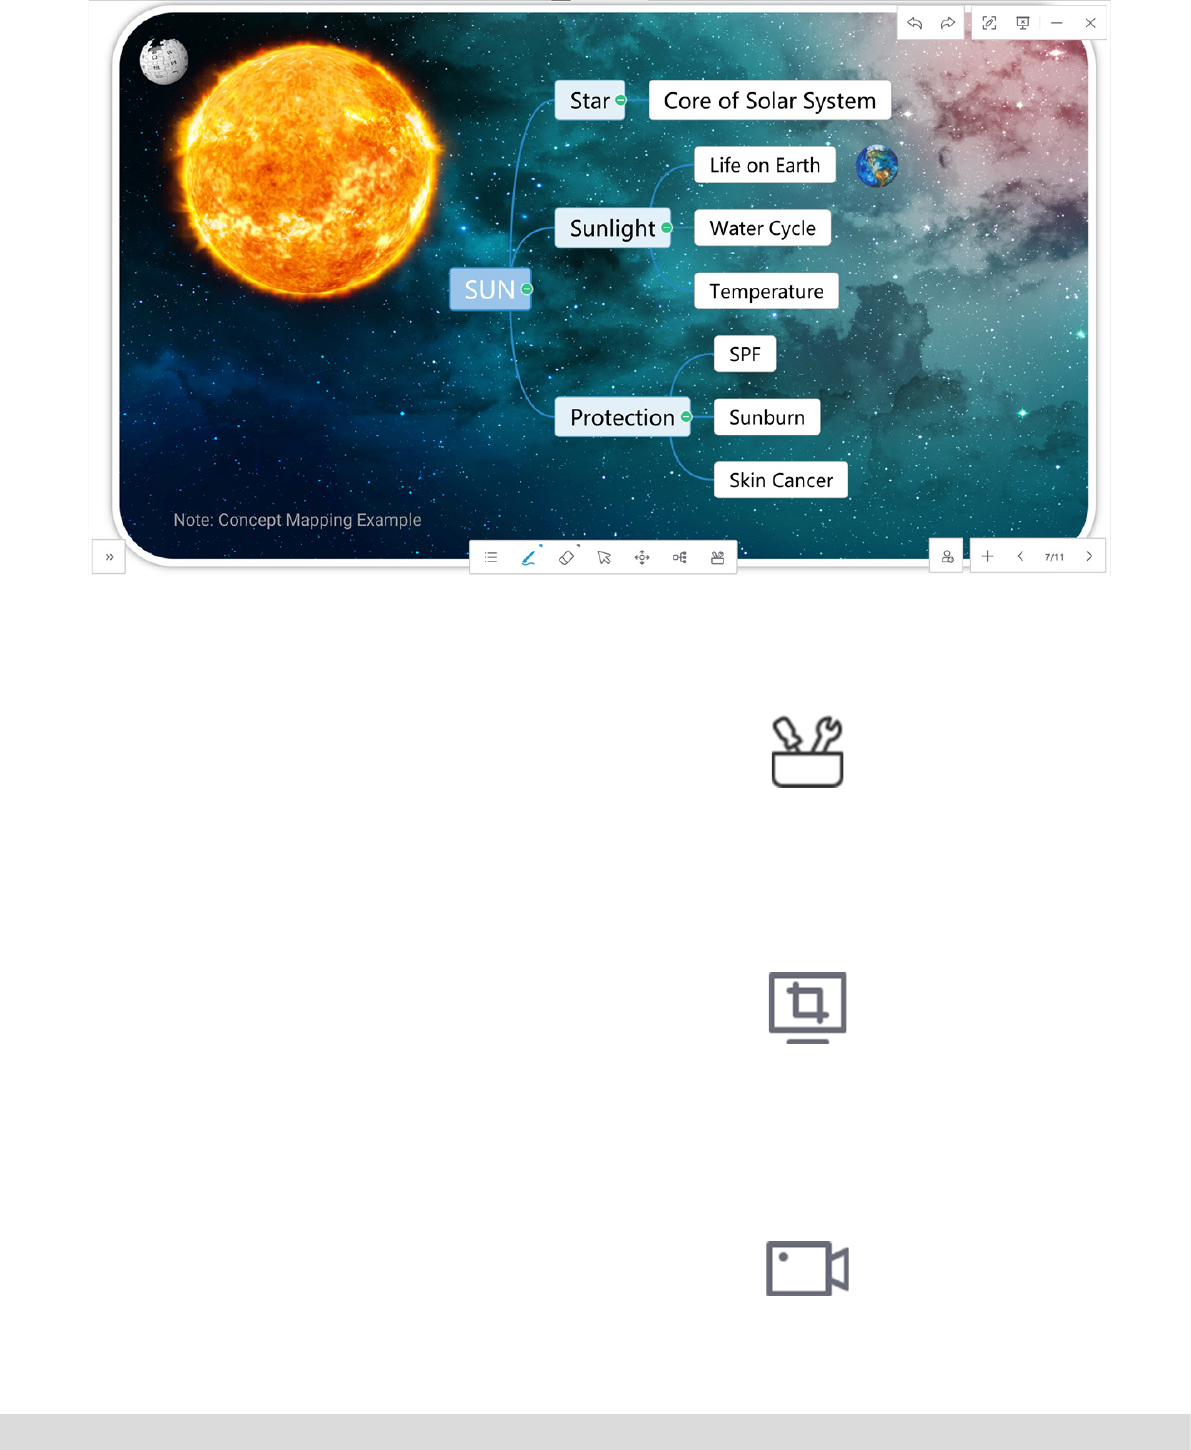
6.13 Concept mapping
Concept mapping icon
There are several types available
Once selected you can enter text details into
the concept map as well as add new topics
Other options for the concept map are
shown in left hand formatting panel
PAGE 30
www.newline-interactive.com/eu/
Example of nished activity in presentation mode
A number of other tools are available in the
software these can be launched from the
tools icon.
6.14 Other Whiteboard Tools
Tools icon
Enables the teacher to grab an image of
what is happening on the whiteboard can-
vas either as a full screen or a partial screen
capture and then save the image back to
the canvas or to the desktop
Allows you to record the lesson and then
edit and playback later
6.14.1 Print Screen
6.14.2 Record
Print Screen tool
Record tool
PAGE 31
www.newline-interactive.com/eu/
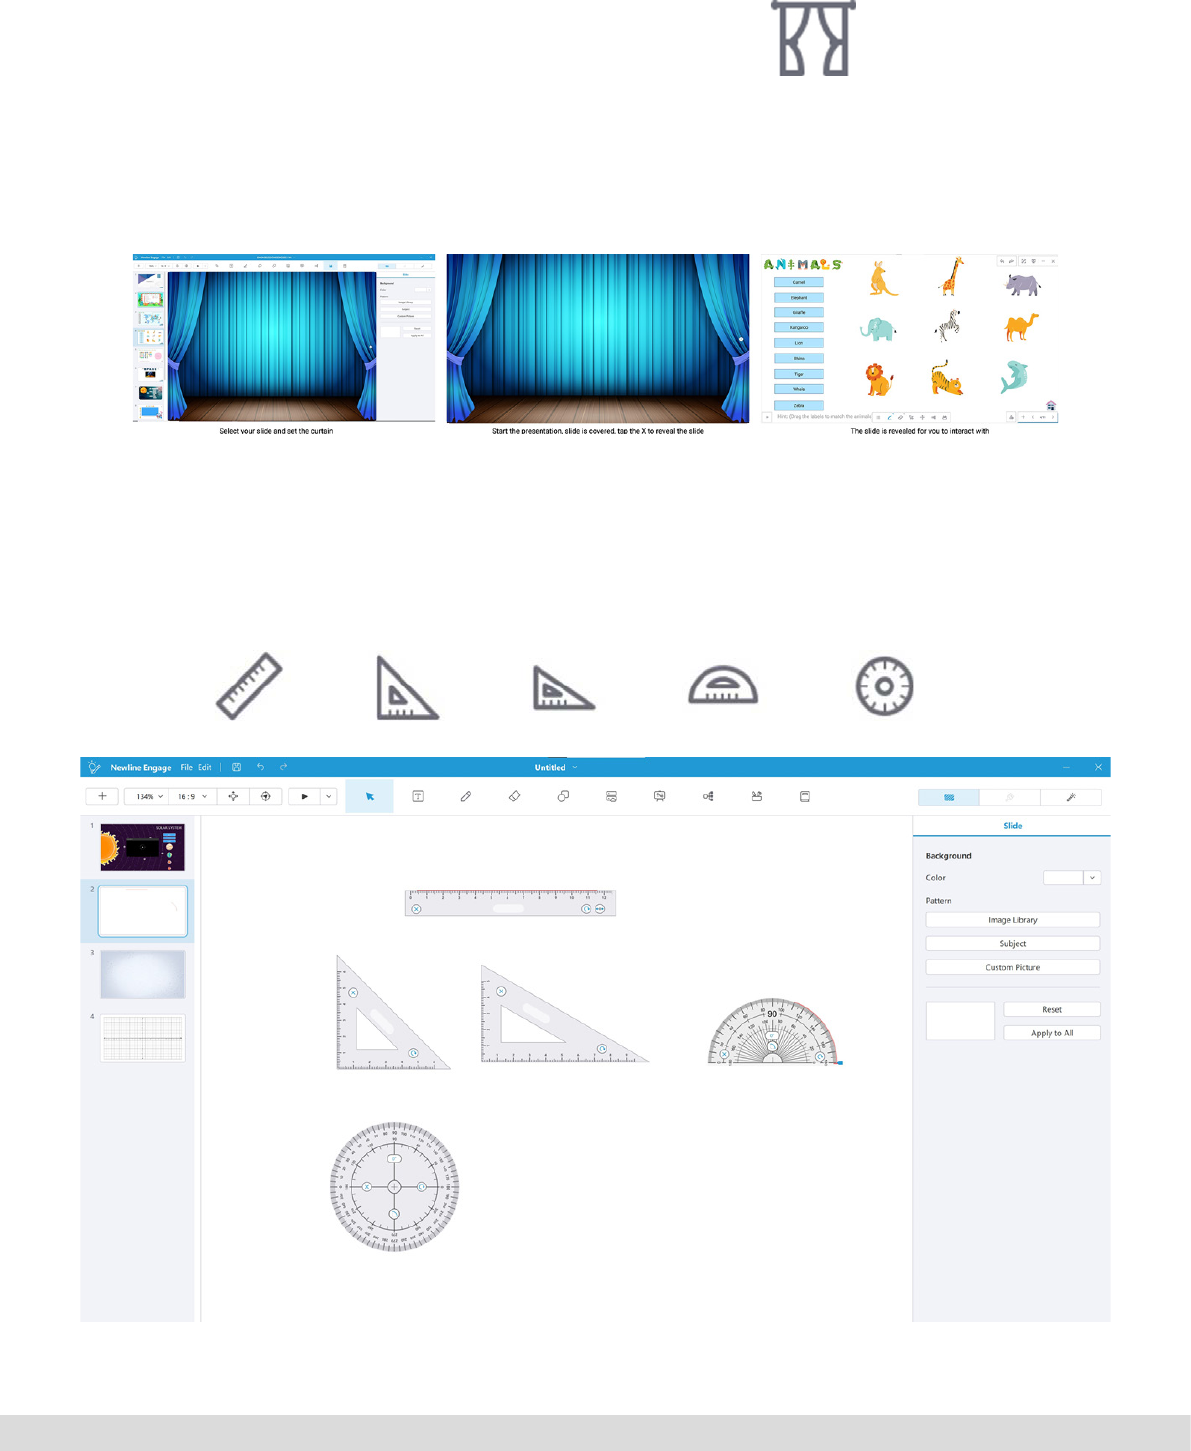
This creates a curtain that covers the whi-
teboard canvas content underneath can be
revealed by tapping the “x” on the screen.
Provides a number of interactive tools that
can be used on the whiteboard canvas.
6.14.3 Curtain
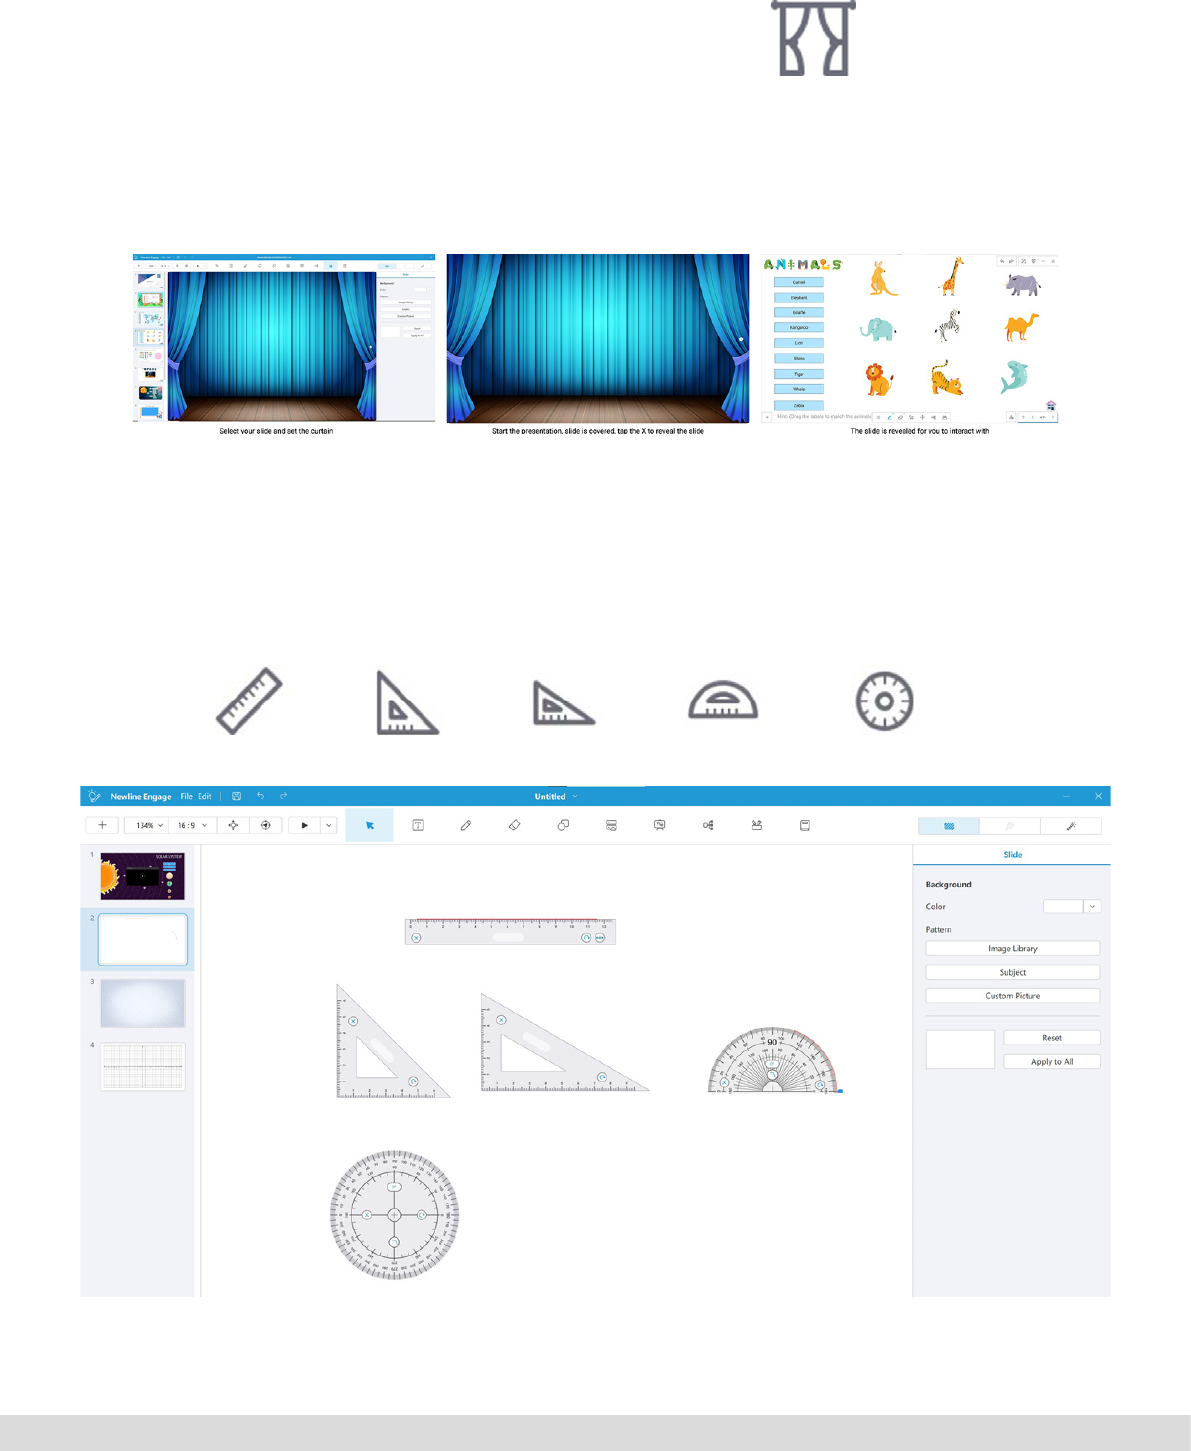
6.14.4 Ruler / Set Squares / Protractors
Curtain tool
The example below shows how you could use this in a lesson by adding the curtain to your slide in pre-
sentation mode so when you start the screen is covered by a curtain.
PAGE 32
www.newline-interactive.com/eu/
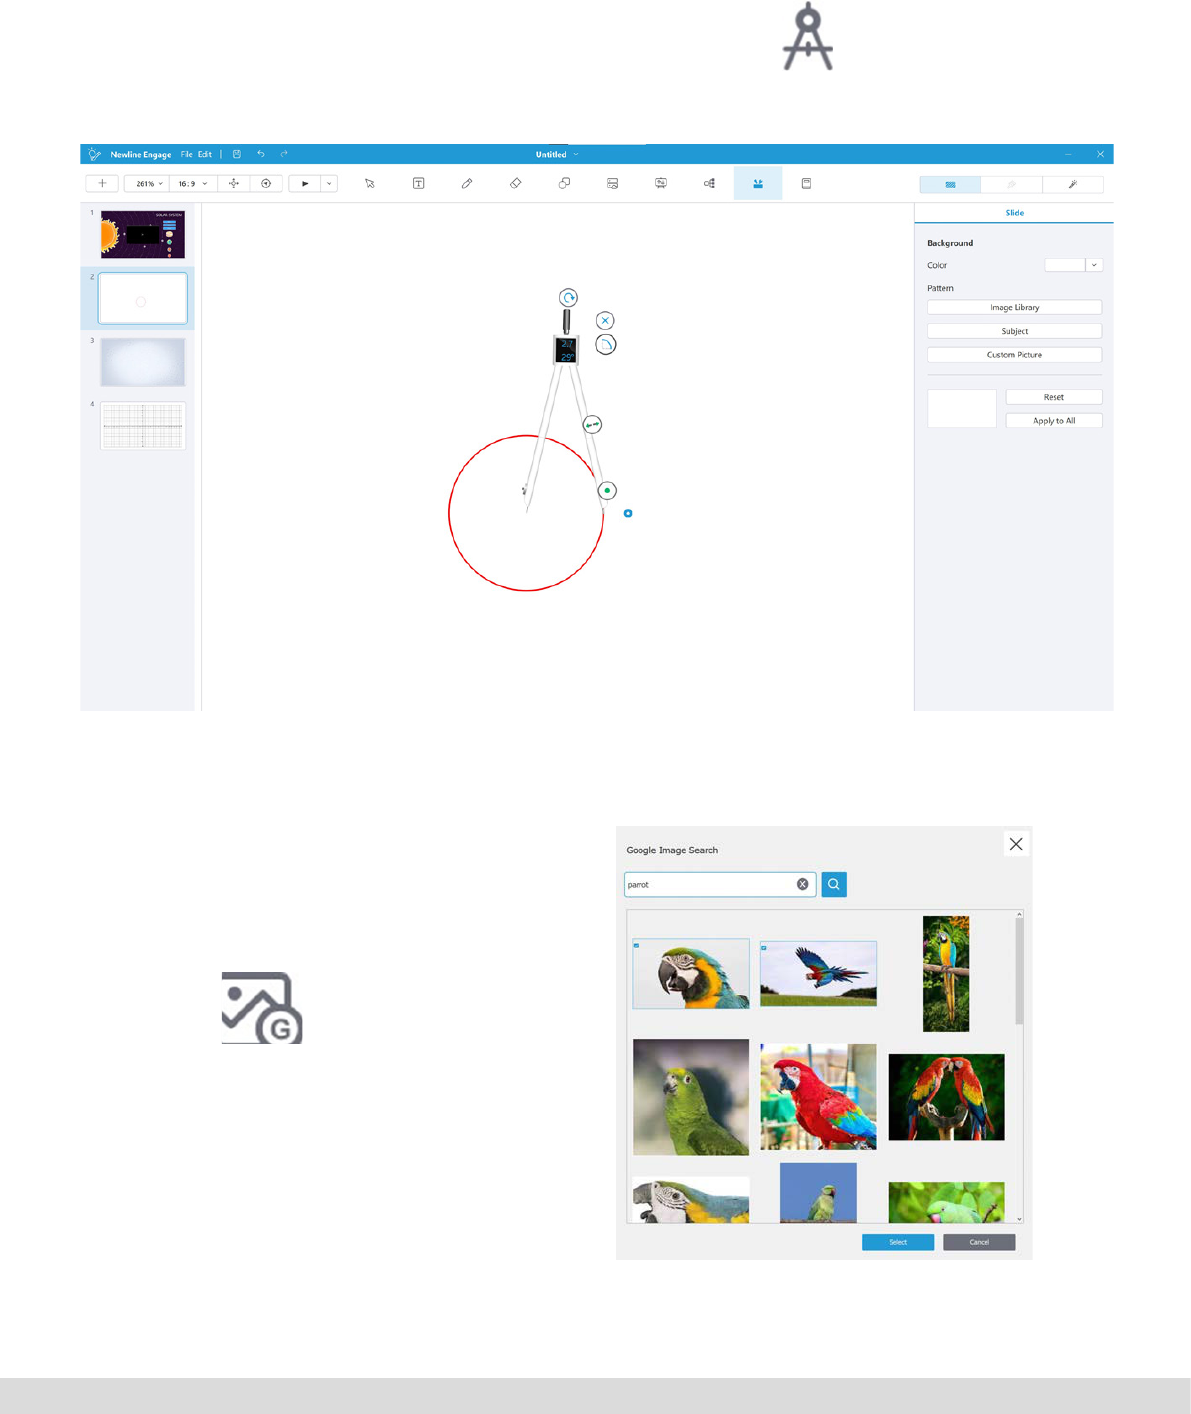
An interactive compass which can be pla-
ced on the canvas and used to draw circles
and explain angles.
6.14.5 Compass
Compass tool
Goggle images search allows you to search
for images to add to the canvas.
6.14.6 Google image search
PAGE 33
www.newline-interactive.com/eu/
This creates a curtain that covers the whi-
teboard canvas content underneath can be
revealed by tapping the “x” on the screen.
Provides a number of interactive tools that
can be used on the whiteboard canvas.
6.14.3 Curtain
6.14.4 Ruler / Set Squares / Protractors
Curtain tool
The example below shows how you could use this in a lesson by adding the curtain to your slide in pre-
sentation mode so when you start the screen is covered by a curtain.
PAGE 34
www.newline-interactive.com/eu/
6.15 Some additional tools available in presentation mode
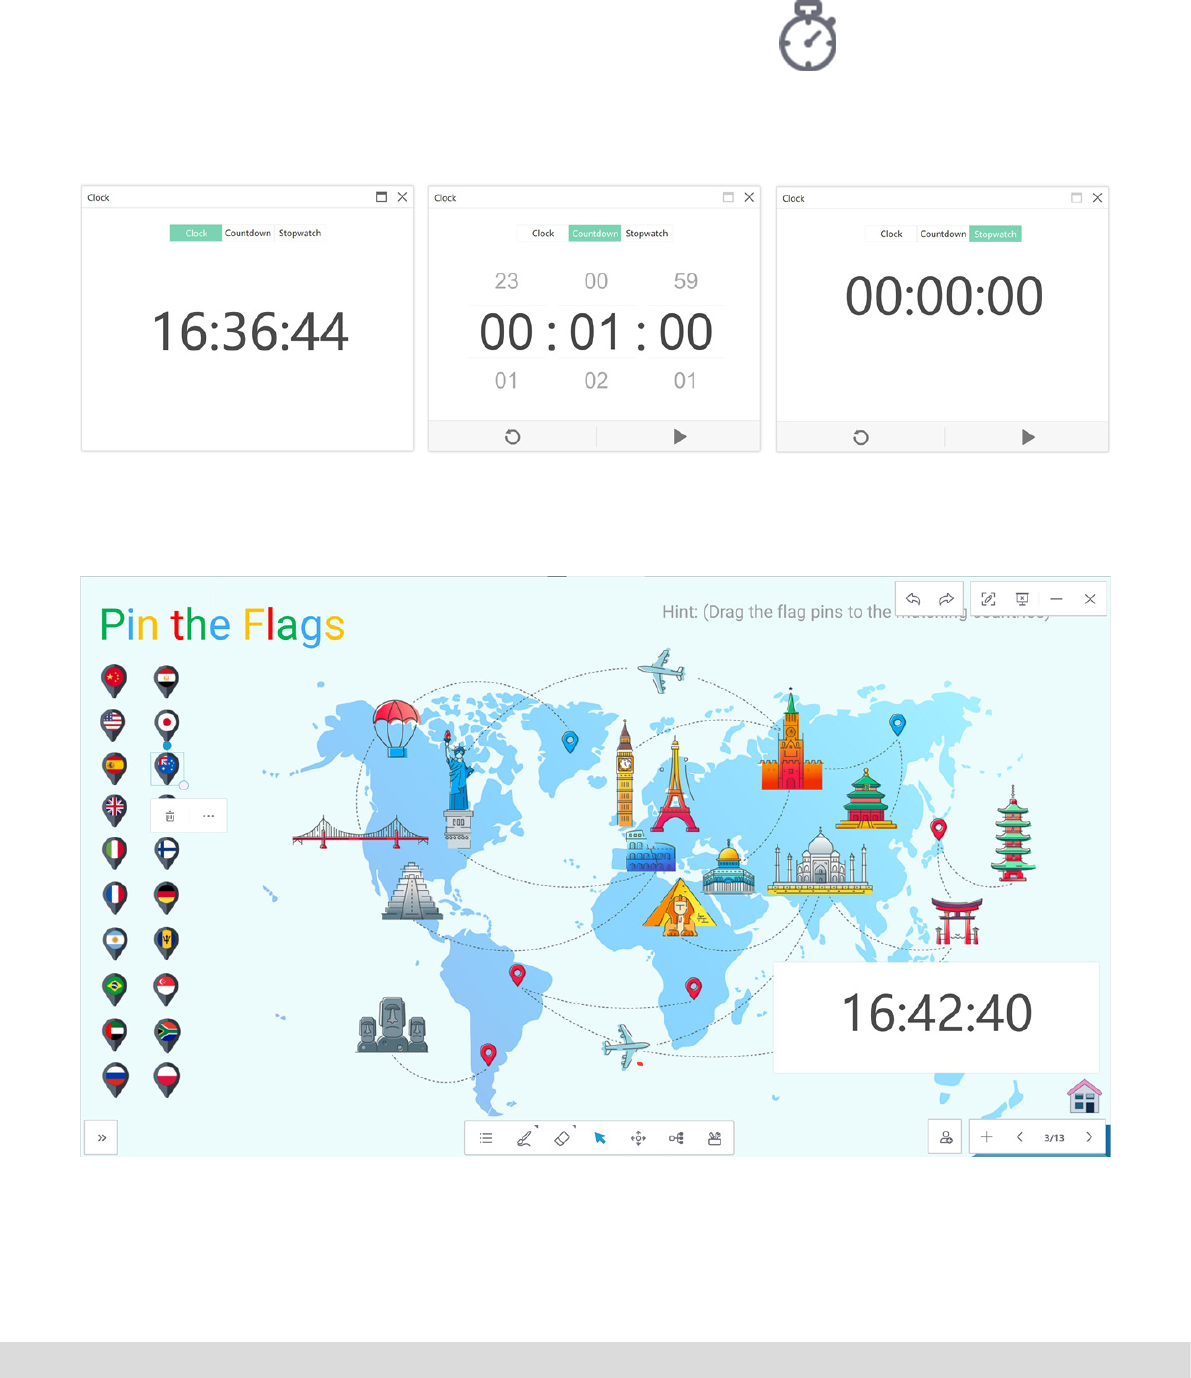
This tool gives you the options for 3 clock
types, time, countdown, stopwatch these
sit over the whiteboard.
6.15.1 Clock
Clock tool
In the example below a clock has been added to the canvas
PAGE 35
www.newline-interactive.com/eu/
This handy tool allows you to zoom in on a
section of the canvas to look into objects in
more detail.
The spotlight tool can be very useful for
highlighting content on the screen, when
launched you have options to make the hi-
ghlighted section darker or lighter, change
the size of the spotlight and change the
shape from circle to square.
6.15.3 Magnier
6.15.2 Spotlight
Magnier tool
Spotlight tool

PAGE 36
www.newline-interactive.com/eu/
Newline Engage contains a wide resource
of subject specic content that is easy to
add to your whiteboard canvas over 130
pieces of content is available.
6.15.4 Subject specic content
Subjects icon
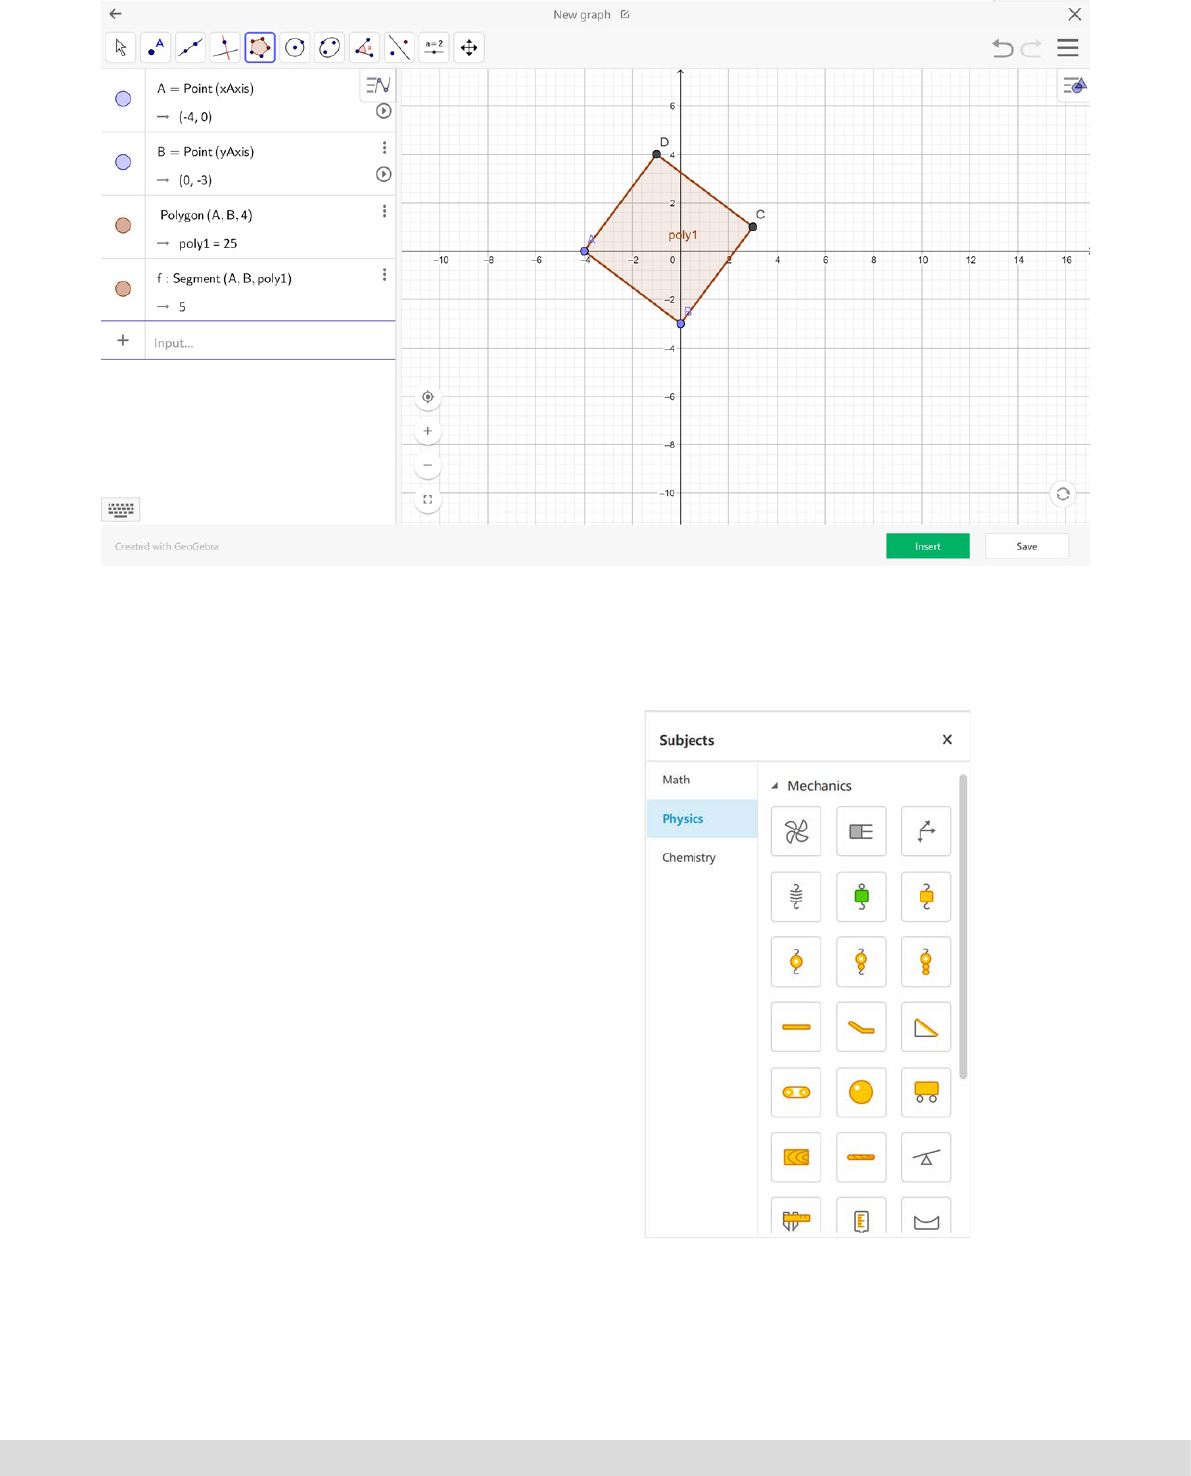
A wide range of maths symbols and sha-
pes, as well as an interactive equation edi-
tor and interactive graphing tool.
Maths
PAGE 37
www.newline-interactive.com/eu/
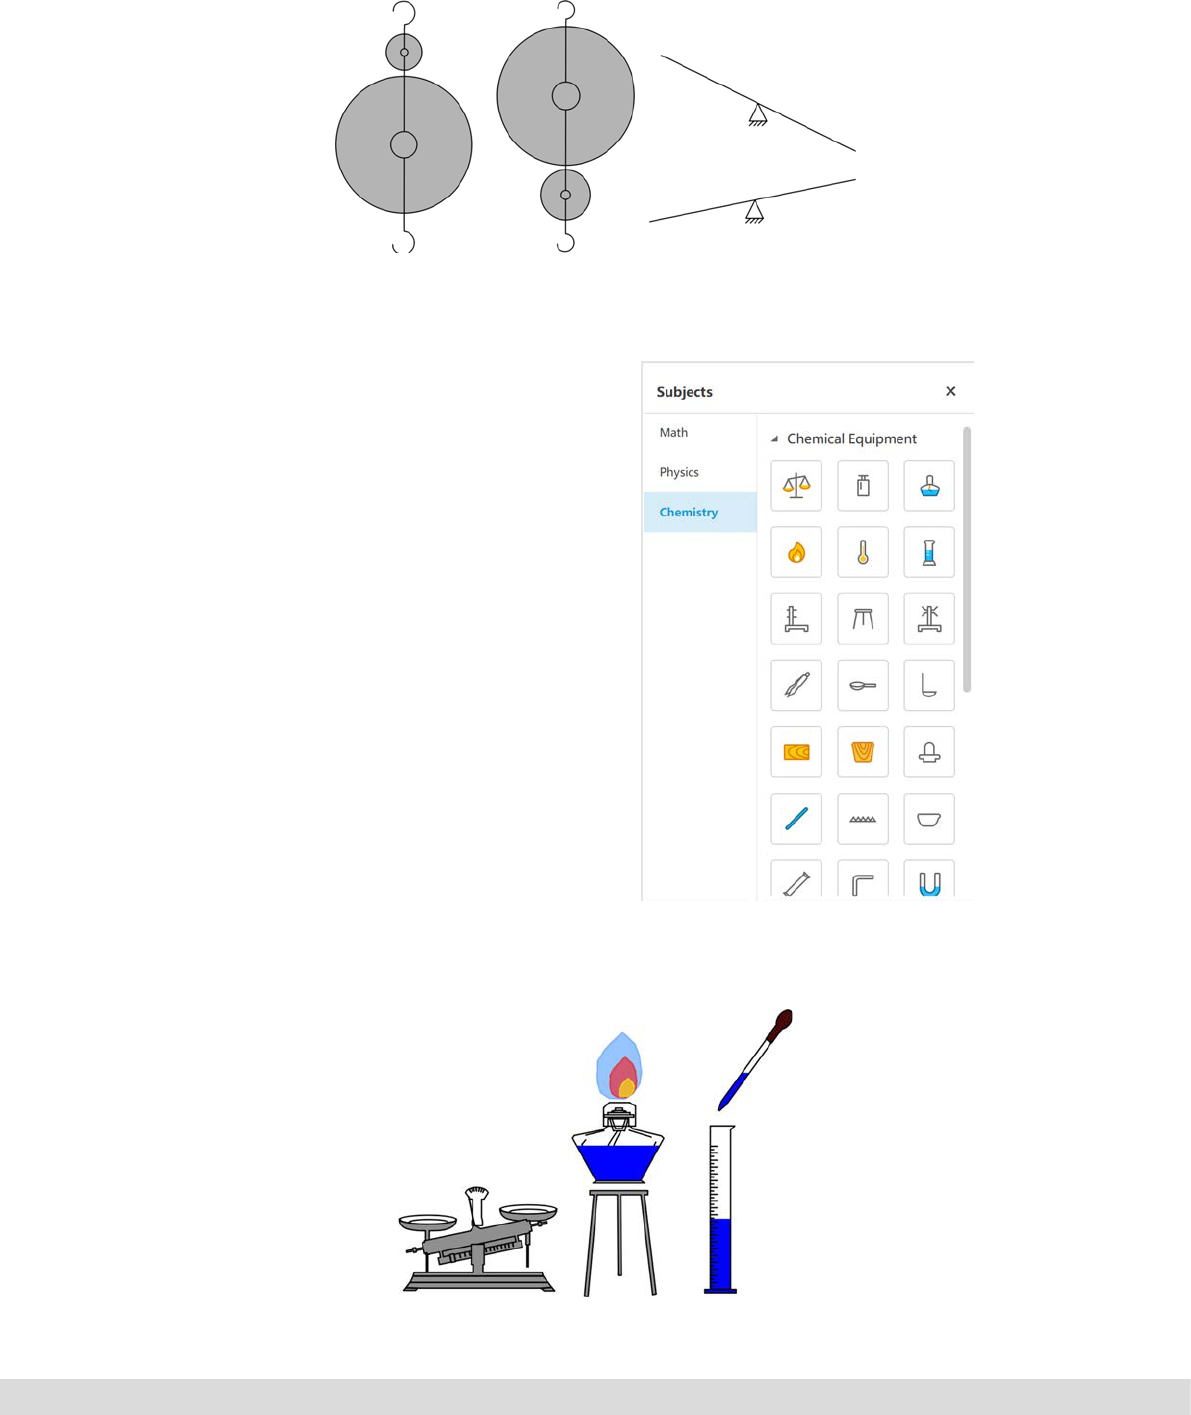
A wide range of physics symbols and sha-
pes some of which can be interacted to
change properties such as levels of liquid
in a container.
Example of the interactive graphic tool
Physics
PAGE 38
www.newline-interactive.com/eu/
A wide selection of chemistry objects some
of which can be interacted with and exam-
ple is to be able change levels of liquid in a
container.
Chemistry
Examples of using the chemistry objects to create different scenarios
Examples of physics objects added to a whiteboard canvas where elements have been adjusted to create
different example.
PAGE 39
www.newline-interactive.com/eu/
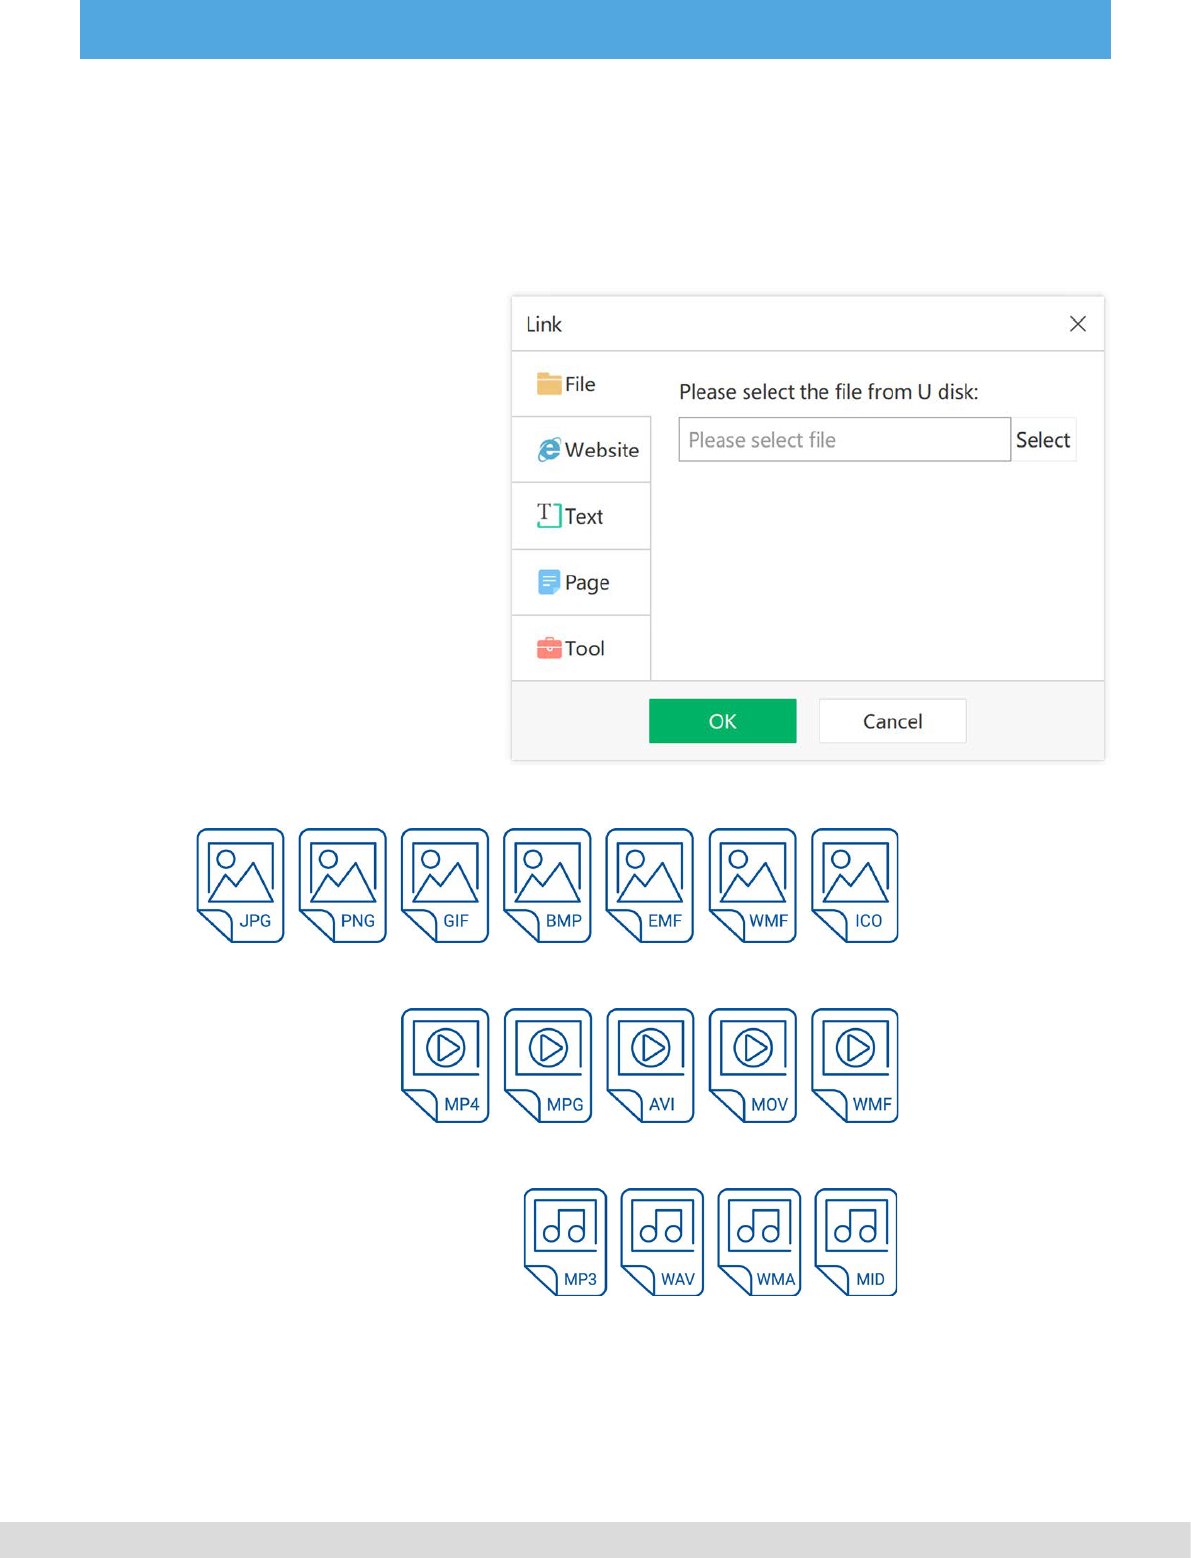
7. ADDING LINKS TO AN OBJECT /PREPARATION MODE
By right clicking on an object or clicking on the object and selecting the 3 edit dots you are able to create
the following links that are opened when the the object is selected in presentation mode.
This allows you to link to a le saved on
the teachers laptop or desktop the le
will open when the object is clicked on.
7.1 Files
Video formats supported
Audio formats supported
Image formats supported
Documents:
Any document le can be linked to, the
application the document was created
in will launch when selected.
PAGE 40
www.newline-interactive.com/eu/
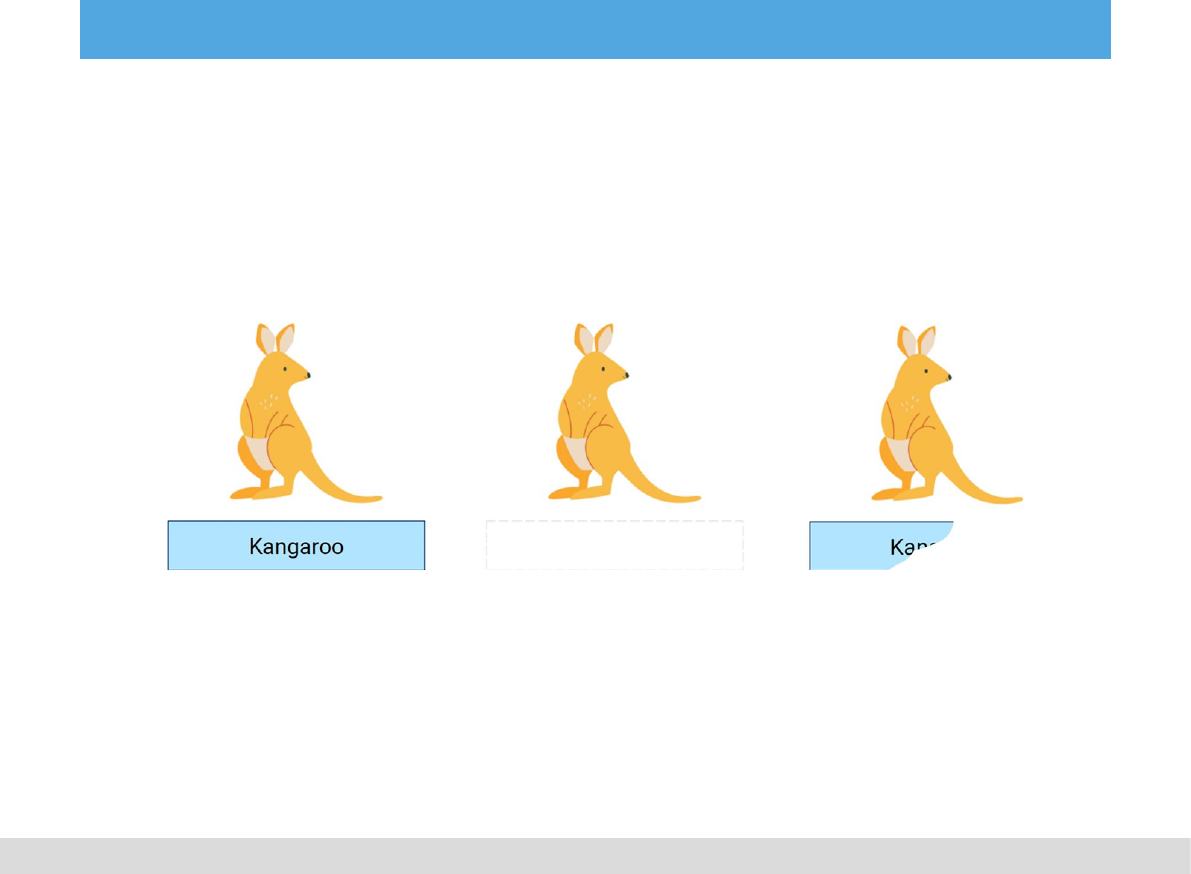
8. COVER LAYER FOR OBJECTS /PREPARATION MODE
By right clicking on an object or clicking on the object and selecting the 3 edit dots you are able to add a
cover for this object that can be erased using the eraser tool when in presentation mode, in the example
below a cover layer is added to the label under the kangaroo which can then be gradually erased when the
lesson is in presentation mode.
This allows you to link to a le saved on the teachers laptop or desktop the le will open
when the object is clicked on.
Enter text to be displayed when the object is clicked on.
Jump to a selected page in the whiteboard le when the object is clicked on.
Launch a whiteboard tool when the object is clicked on for example, spotlights or curtain to
7.2 Website
7.3 Text
7.4 Page
7.5 Tool
PAGE 41
www.newline-interactive.com/eu/
9. GOOGLE DRIVE LOGIN
There are two methods of logging into your google drive to access resources.
By selecting the account login icon in
the bottom right hand corner.
You are given a QR code to scan with
your phone or the option to manually lo-
gin using the “sign in” menu option, this
will give you access to les and resour-
ces on your Google drive
You can access content on your google
drive through the resources icon on the
main menu toolbar.
This will give you the option to login via
QR code or manually enter your login
details.
9.1 QR Login - Presentation Mode
9.2 QR Login - Preparation Mode
PAGE 42
www.newline-interactive.com/eu/
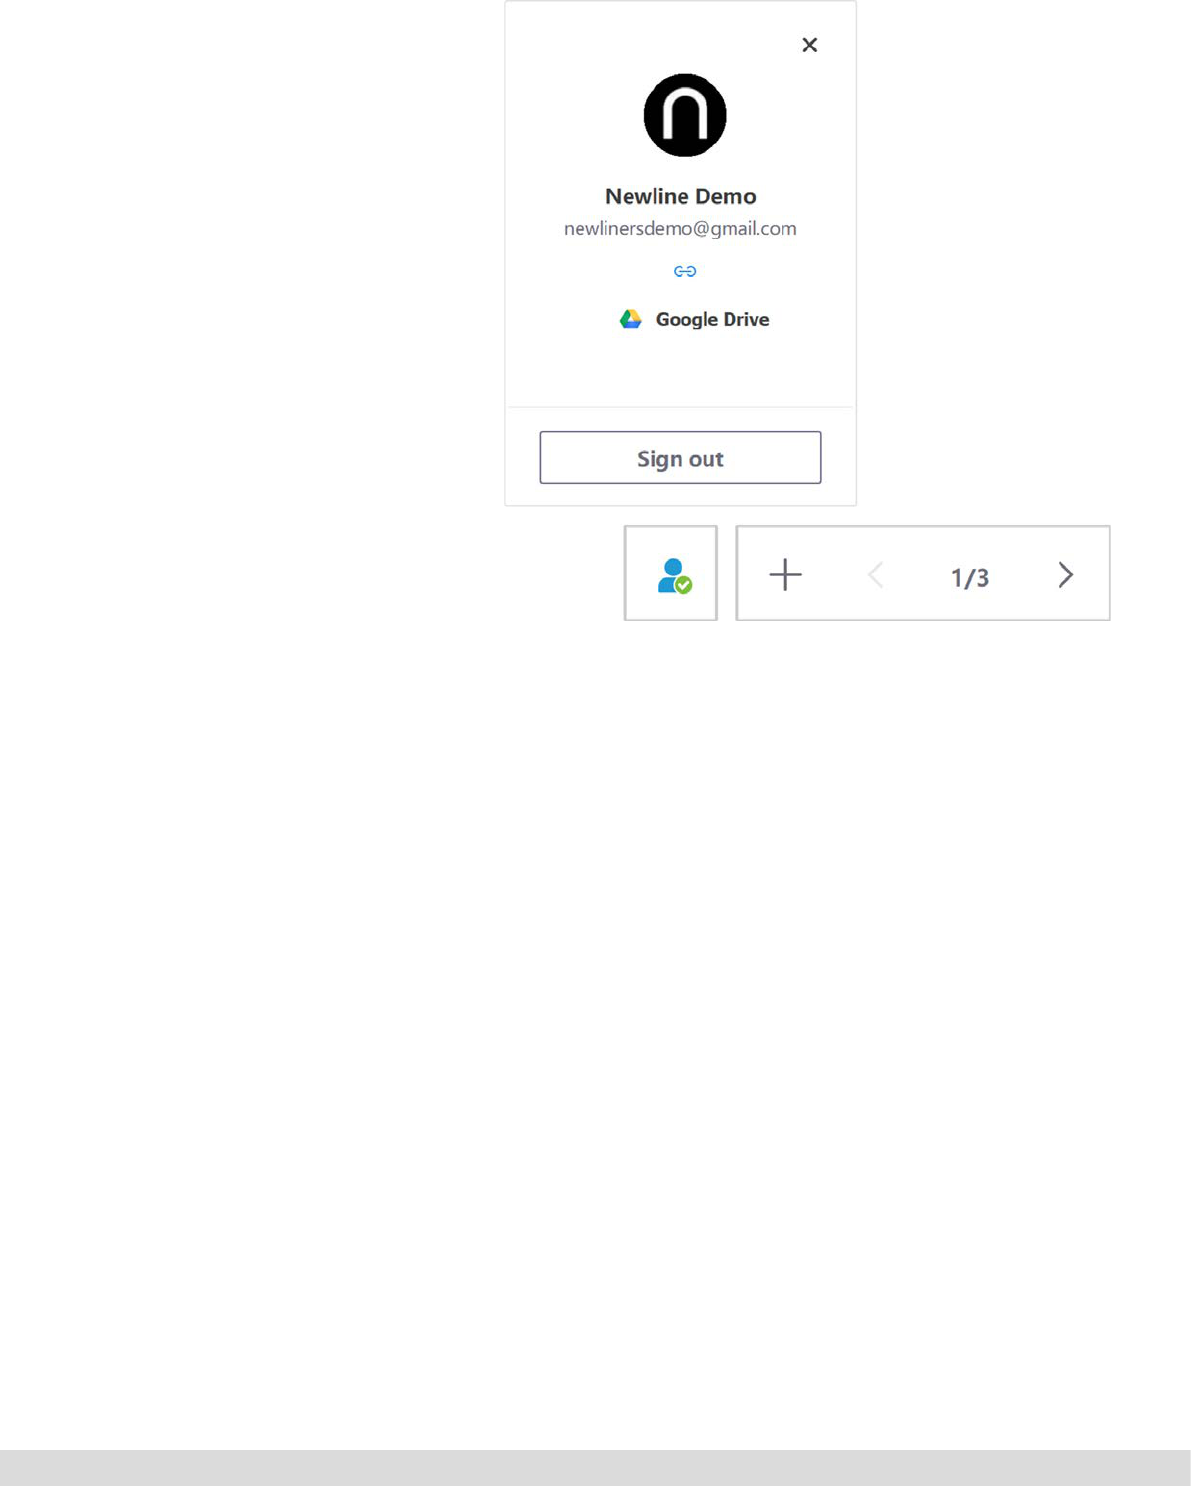
When you have successfully logged in
you will see a green tick mark and your
google account details, you can then
load whiteboard les and insert images
and videos from your google drive.

PAGE 43
www.newline-interactive.com/eu/
